Cook's Country
Snack Cake and Sandwich Cookies
9/21/2024 | 26m 25sVideo has Closed Captions
Carrot Snack Cake, Oatmeal Creme Pies; review of water bottles
Test cook Carmen Dongo bakes host Toni Tipton-Martin a delicious Carrot Snack Cake. Equipment expert Adam Ried shares our recommended water bottles. Test cook Christie Morrison and host Bridget Lancaster bake nostalgic Oatmeal Creme Pies.
Problems playing video? | Closed Captioning Feedback
Problems playing video? | Closed Captioning Feedback
Cook's Country is presented by your local public television station.
Distributed nationally by American Public Television
Cook's Country
Snack Cake and Sandwich Cookies
9/21/2024 | 26m 25sVideo has Closed Captions
Test cook Carmen Dongo bakes host Toni Tipton-Martin a delicious Carrot Snack Cake. Equipment expert Adam Ried shares our recommended water bottles. Test cook Christie Morrison and host Bridget Lancaster bake nostalgic Oatmeal Creme Pies.
Problems playing video? | Closed Captioning Feedback
How to Watch Cook's Country
Cook's Country is available to stream on pbs.org and the free PBS App, available on iPhone, Apple TV, Android TV, Android smartphones, Amazon Fire TV, Amazon Fire Tablet, Roku, Samsung Smart TV, and Vizio.
Providing Support for PBS.org
Learn Moreabout PBS online sponsorship♪♪ -"Cook's Country" is about more than just getting dinner on the table.
We're also fascinated by the people and stories behind the dishes.
We go inside kitchens in every corner of the country to learn how real people cook.
And we look back through time to see how history influences the way we eat today.
We bring that inspiration back to our test kitchen so we can share it with you.
This is "Cook's Country."
♪♪ Today on "Cook's Country," Carmen and I whip up a carrot snack cake, Adam recommends the best water bottles, and Christie makes Bridget oatmeal creme pies.
That's all right here on "Cook's Country."
-Funding for this program has been provided by the following.
-Monument Grills, offering innovative technology and design for the grilling enthusiast.
With a lineup of gas grills to suit every level, our mission is to ignite your passion to pursue the art of grilling.
Learn more at monumentgrills.com.
♪♪ -There was a time when a slice of rich, dense carrot layer cake was a go-to dessert on everybody's menu.
But it was a lot of work.
So today, Carmen is going to show us a simplified version that's easy to make.
-That's right, Toni.
Our version of carrot snack cake comes with all of the flavors and textures that you would expect, but none of the fuss that comes with stacking and frosting a layered dessert.
Let's start with our main ingredient -- carrots.
I have here 1 pound of peeled carrots.
This will yield about 12 ounces once they're shredded.
We have a food processor fitted with a shredding disc.
This is gonna make quick work of this.
[ Click, food processor whirring ] Well, we have shredded our carrots.
To complement the earthy flavors that the carrots bring, we're gonna use fruit.
I have here 1 cup of golden raisins.
We're gonna complement all of those delicate, fruity flavors by adding a 1/4 cup of orange juice to them.
I'm gonna make sure to cover these, and we're gonna pop this right in the microwave for one minute until they're softened and plumped.
Toni, these raisins have been sitting on the counter covered for five minutes.
They're nice and soft.
Let's move on to our batter.
I have here 2 1/2 cups of all-purpose flour.
I'm going to add to that 2 teaspoons of baking powder, 1 teaspoon of baking soda, 3/4 of a teaspoon of table salt.
I have here 1 tablespoon of pumpkin pie spice.
This is a real convenience ingredient that has four spices -- allspice, cinnamon, nutmeg, ginger.
Whisk these together.
So let's move on to our wet ingredients.
I have in this large bowl 1 1/2 cups of packed light brown sugar.
I'm gonna add to that 1 1/4 cups of vegetable oil, 4 eggs, and 1 tablespoon of vanilla extract.
Now I'm gonna whisk these wet ingredients together.
Now to this wet mix I'm gonna add our lovely carrots.
-Want your raisins?
-I'll also add our raisins.
Thank you.
-Okay.
Let me get those for you.
-They smell so nice from that orange juice.
-Oh, yeah, they do.
It's great.
-Mm-hmm.
Now let's combine our wet and our dry ingredients.
When I fold ingredients together, I like to securely hold the bowl and rotate.
And that helps everything get distributed evenly.
And I'm very careful to get all of the sides involved.
I'm not trying to leave anything behind.
-The aromas are already starting to commingle in the bowl.
-Mm-hmm.
We have to wait, though, Toni.
We have to bake this.
-Okay, okay, I'll wait.
-[ Laughs ] I've gone ahead and sprayed a 13x9-inch baking dish, so let's transfer our batter over.
My batter is in the pan.
I'm gonna smooth it out so that it's even.
I want an even bake here, and I don't want any craggly bits at the top.
Toni, our cake is ready to bake.
We're gonna transfer it right over to the oven.
I've made sure to preheat that to 350 with the rack in the middle position.
This will bake anywhere between 33 to 38 minutes.
I'll be sure to give it a spin halfway through.
That cake is looking real good.
-It smells fantastic.
-Mm-hmm!
Let's go ahead and get this out on this wire rack.
Toni, this cake smells so good.
I think it's baked, but I want to make absolute sure.
I'm gonna use a toothpick to make sure this is fully baked.
It needs to be completely clean when it comes out.
We have another step here, which is a buttermilk syrup.
I have here 1 cup of confectioners' sugar and just 2/3 of a cup of buttermilk.
Really a small amount.
I'm gonna whisk them together.
So I'm just gonna pour this right on top and brush it very evenly throughout the cake.
-That looks so decadent already.
-Gravity is our friend, and that's gonna really sink in.
The cake is really warm.
It's gonna absorb all of that syrup.
And as it cools, it's gonna permeate into every nook and cranny of the cake.
-Makes perfect sense.
-I'm gonna let this cool completely.
This will take about three hours.
Toni, it's time to make our frosting.
I have here 2 cups of confectioners' sugar.
Pop that right in.
I'm gonna add 12 ounces of cream cheese.
I have completely softened this.
You have to be patient and let it make sure it's nice and soft.
I have a whole stick of butter, which is 8 tablespoons of butter -- softened, of course -- and 1 teaspoon of vanilla extract.
We do need salt here to offset all those sweet flavors.
Just an 1/8th of a teaspoon will do it.
I'm gonna let this process until smooth for about 30 seconds.
I just want to make sure it's completely smooth.
Mm-hmm, no circles of butter, no circles of cream cheese.
It's a nice even frosting.
Let's clean up, and then we can frost this cake together.
-Sounds great.
-This cake is ready to get frosted.
It is glistening.
I can see that sheen from the buttermilk syrup that we poured over it.
And it's cool to the touch.
So let's get to frosting.
I like to do three big dollops right down the middle, and that way I can distribute everything nice and evenly and don't run out, right?
-Mm.
-So I'm gonna use a large offset spatula just to create my shape.
All right, and this is a great opportunity for a small offset spatula.
I'm gonna start at the top, and I'm gonna make tiny swooshes.
Just because this is a fast cake doesn't mean it doesn't have to look pretty, right?
-Absolutely.
-It's gonna look very beautiful.
-Very thoughtful.
-Now, visual contrast is very appreciated with cakes as well.
I have here 1 cup of toasted pecans.
I've chopped them as well.
Scatter them right over top.
This is gonna provide a nice crunchy contrast and also a nice visual contrast.
-It's beautiful.
-That's all we need.
So let's slice and serve.
I like to cut it right down the middle.
-Quarters.
-Exactly.
And then I can evenly cut what I need.
We have our two edges here.
-Okay.
I've been waiting for this.
-Been waiting for hours.
-[ Laughs ] -This looks very very good.
-It's beautiful.
Mmm.
-Mm-hmm.
-Very good.
-The earthiness from the carrots and the sweetness from, of course, the buttermilk syrup but also the golden raisins.
This hits all of the check marks that you expect, but it's just so streamlined and efficient.
We're not sacrificing on flavor here.
-This was delicious, Carmen.
Thank you so much.
-It's my pleasure.
-So for a delicious snack cake that you can have anytime, shred your carrots in a food processor, use pumpkin pie spice blend, and moisten the cake with a tangy buttermilk syrup.
From "Cook's Country," a delicious, quick, and easy carrot snack cake.
I cannot wait to make this for my family.
-I don't know how long it'll last on the counter, though.
This would be done in one day for me.
♪♪ -Growing up, we all had the same water bottle.
It was a round metal canteen with a canvas strap that went around your shoulder, and we got it at the local Army-Navy surplus store.
But that is not the case today.
Today there is an arsenal of options, some of them pretty expensive and stylish.
It's almost like a status symbol.
-Yeah, you don't need a BMW anymore, Julia.
You just need the right water bottle.
And we are here to help.
We tested 12 different water bottles.
Their capacities ranged from 20 ounces to 34 ounces.
The prices ranged from a low of 13 to a high of about 45.
And there were three basic materials -- plastic ones like these, stainless steel ones like the ones in front of you... -Mm-hmm.
-...and then glass like these.
Let's start with the plastic.
Plastic is lightweight, which is great.
When it was full, it averaged close to a half pound lighter than stainless steel or glass bottles.
And for a long hike, that's really nice.
However, they tend to collect condensation, so they'll get a little drippy and slippery sometimes, and they don't keep water super cold all day long.
Moving on to the stainless steel models, those did a better job at keeping water cool for more than eight hours if they're double walled.
They're super durable.
They tend to be heavier, though -- close to about three pounds when they're filled with water.
-Oh, wow.
-And last, the glass ones.
These most closely mimic the experience of drinking out of a regular drinking glass.
They did not keep water cool all day long.
They did collect some condensation.
And of course, if you drop these you could run into a durability issue.
Testers appreciated the fairly wide mouth on these guys -- 2 1/4 inches or bigger.
That just made it easier to get the water in, also to slip in a bottle brush to clean it.
-Yep.
-Their opinions, however, were divided when it came to drinking out of a wide-mouth bottle.
-Yeah.
-And I want to see what you think.
So this one has... -[ Laughs ] -I know this water bottle.
-You do?
-I do.
These are actually made in my hometown.
So I'm well versed in how to drink out of these.
Cheers.
Mm-hmm.
-Wow!
Look at you go.
-Yeah, I'm good with these.
I really appreciate the wide mouth, especially when you're hiking.
-You definitely had your compatriots in the testing crew, but other people thought it was too easy to dribble with them.
A lot of these come with different sorts of mouthpieces for drinking.
And, you know, testers gave the thumbs-up to most different designs.
However, there was one that was universally disliked, and now you get to drink from that one.
-Okay.
-This is a bite valve.
-What does that mean?
-You flip it open like that.
And you have to bite down on it to get water out.
[ Laughs ] -Oh, all sorts of no.
-Testers thought that that was really uncomfortable.
Water would get trapped in there.
Hard to clean it out.
-Yes.
Oh, and awkward.
-Yeah, you are definitely in the majority there.
Some of them had built-in straws that you would flip open.
And testers thought that the straws were comfortable to drink from.
Not always easy to clean.
-Yes.
-And then there are different designs of caps.
One manufacturer had something called a chug cap... -[ Laughs ] -...which testers loved.
And that's this one, and I want you to give that a try.
-All right.
So... -You open it up, and look.
-Mm-hmm.
Oh.
But there's two.
You can do that or that, right?
-You know the secret.
-I do.
-You know the secret.
-I love the ones with the big opening, so that's why... Yeah, chug.
Mm-hmm.
Mm-hmm.
Or if you want to be a little more dainty.
-And people like that chug cap.
What do you think?
-Mm-hmm.
-I'm good with it.
-Yeah.
-Cleanability is pretty important to.
-It is.
-Because a lot of bacteria can build up in these little parts.
-And you do not want to be chugging that down every day.
Since you're toting these around all day -- sometimes you want to clip them on to a backpack or just hold them with your fingers -- the handles were important.
-Yeah.
-And exactly.
You picked a great one.
The bigger handles, the loops like that, or something that was a little more squared, like this one.
Now, of course, a water bottle, leakage is the kiss of death there.
-Especially in a backpack.
-Oh, my gosh.
And we did a couple of durability tests.
We actually dropped them from a kitchen counter -- a height of about three feet -- onto a kitchen floor, as well as from a height of six feet onto concrete.
Most of them survived just fine.
-Mm-hmm.
-Except for some of the glass ones... -Yeah.
-...which cracked, some shattered.
So because each one of these materials had pros and cons, we recommend one in each material.
In front of you we have the stainless steel bottles.
The recommendation there is the Yeti Rambler for $40.
We also recommend a plastic Yeti.
This is the Yeti Yonder for $28.
And if you have your heart set on a glass bottle, we recommend this one.
This is the Lifefactory glass water bottle with a classic cap -- $23.
-There you have it.
If you're looking for a new water bottle, you have some choices.
If you're looking for glass, check out the Lifefactory glass bottle.
If you like plastic, go for the Yeti Yonder.
And if you like stainless steel, check out the Yeti Rambler.
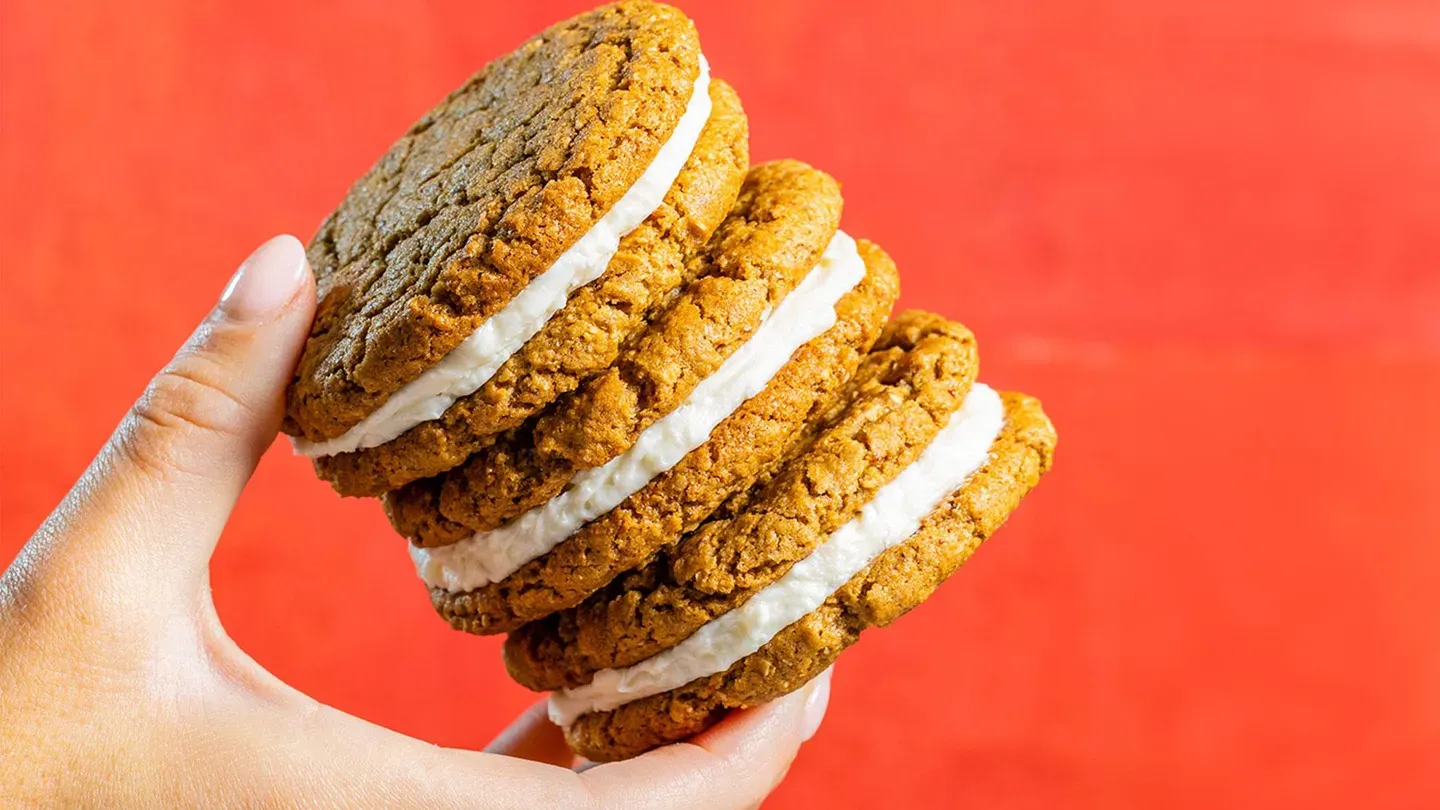
♪♪ Little Debbie oatmeal creme pies hit grocery stores back in the 1960s, but its precursor came a few decades earlier.
Oather Dorris McKee was a baked goods salesman, and he took some harder oatmeal cookies, changed the recipe to make them soft, and then used them to sandwich creme.
Oather Dorris, who was also known as O.D., later on started his own company to sell those creme pies, and he used his granddaughter, who was four at the time, named Debbie, as the face and the name of the company.
Well, that history stops today.
We're starting a brand-new page.
We've got Little Christie here.
She's gonna make her own version of oatmeal creme pies.
It's gonna knock our socks off.
-There's a lot of nostalgia around this cookie, but that's not the only reason to make it.
-Mm-hmm.
This has really deep oatmeal and molasses flavor.
And then we've got the soft, fluffy filling.
It's not just, can we make this cookie, but we should make this cookie at home.
-We need to make this cookie.
-We're gonna make this cookie.
-Okay.
-We're starting with some oats.
So the texture of Little Debbie's is unique in that we don't see big pieces of oats because they're ground up.
So I have 3 cups, or 9 ounces, of old-fashioned rolled oats.
I'm gonna add these to my food processor.
Now you don't want to use extra thick or thick rolled oats 'cause you'll get a really tough cookie.
-Okay.
-Now the secret ingredient to getting that chewy texture... Are you ready?
Don't tell.
Raisin paste.
Right?
-Oh, okay.
-You get the chewy kind of caramelly texture, but no actual pieces of raisins.
So this is 1/2 a cup, or 3 ounces of raisins.
And we're gonna process these for about a minute until it gets nice and finely ground.
-Okay.
Oats are nice and fine.
I don't see any raisins.
-What raisins?
-Exactly.
Moving on to our dry ingredients, I have a cup of all-purpose flour.
I'm gonna add a teaspoon of table salt and 3/4 of a teaspoon of baking soda.
It's going to help us get that crackly texture that those cookies are really known for.
Okay, so, dry is good.
Let's move on to wet ingredients.
I have 1/2 a cup, or 3 1/2 ounces, of granulated sugar.
And now we have some brown sugar too.
This is actually dark brown sugar.
This is 3/4 of a cup packed, or 5 1/4 ounces.
And I have some molasses here.
This is 2 teaspoons of molasses.
We're using not just molasses but also the dark brown sugar, which contains molasses, -Right.
-...to really double down on that flavor.
-Right, so don't be tempted to use light brown sugar here.
-No.
Now, in addition to the sugars, I have 1/2 a cup of vegetable oil, 4 tablespoons of unsalted melted butter.
And then, finally, you can't have oatmeal cookies without a little cinnamon.
-It's the law.
-It's the law.
So this is a 1/4 teaspoon of ground cinnamon.
So we'll whisk this together.
We want to get it as smooth as we can.
So you may still have a few little lumpies in here, which is okay because as soon as we add the eggs it'll smooth out.
I have 1 large egg and 1 large yolk... -Okay.
-...here that we're gonna use.
This is gonna give us structure and lift and richness.
And then a teaspoon of vanilla extract.
-That looks good enough to eat on its own.
-[ Laughs ] -Okay this is pretty good now.
So we'll start to incorporate the dry ingredients in.
-Okay.
-So I'll add first my flour mixture.
You just want to make sure that all of the dry bits are incorporated.
We shouldn't see any dry flour.
Okay, and finally our oatmeal-raisin mixture.
This will get pretty stiff.
So sometimes, you know, you use your immaculately clean fingers.
You just want to get this so that we don't see any dry bits and everything looks like it's evenly distributed.
-That looks fantastic.
-Now it's time to scoop.
We're gonna portion this into 24 portions.
And these should be 1 1/3 ounces if we weigh them, which is really gonna give you the most accurate, even cookie.
Or you can use a scoop.
A good 1 1/2 tablespoon scoop is great.
So I'm just gonna keep portioning these until I have 24 portions.
-All right.
-Bridget, I finished portioning all 24 dough balls and put them on rimmed baking sheets that I lined with parchment paper.
We're going to roll all of these dough balls into nice, even, round spheres.
-Okay.
-That's the first step.
-Just kind of reshaping them.
-Just nice and...yes.
They're not gonna stay spheres for long.
Now we're going to press these.
-All right.
-So we want to press them into 2 1/2-inch-wide flatter cookies.
-Okay.
-You can use a dry measuring cup.
It doesn't hurt if you grease it a little bit on the bottom.
-Oh, right.
-Just a little pro tip.
Or you can press it with your hand.
-Okay.
-But we're looking for 2 1/2 inches.
-Gotcha.
-2 1/2.
-Oof, all right.
So, flat.
-They're gonna be pretty flat.
But that's what we want.
The baking soda is gonna get them to rise.
Now, Bridget, because we want these to cook so evenly, we would only bake one of these sheets at a time in the oven.
-Right.
-But we have two ovens.
-How about that?
-So I've heated both of them to 400 degrees with the rack in the middle position.
And we'll bake these cookies until we start to see them crack around the edges, and that should take between five and seven minutes.
-Smells great.
-I've got a treat for you.
-All right, I'll meet you over there.
-Okay.
-Well, now.
-Look at them.
Now, they should almost look a little underdone in the center.
So you don't want to go too long.
You can see that they're cracked on the outside.
They've risen and fallen, and now we have fissures.
-Yes.
-We're gonna keep them on the baking sheets and let them cool on the racks for about five minutes.
Then I'll use a spatula to transfer them directly to the cooling racks, and we'll let them cool completely.
And that'll take another 45 minutes.
The cookies are done.
They're cooled.
They're waiting for us.
Now we need to make the filling.
-Okay.
-Now, we want a filling that's soft and fluffy, but it's firm enough that it's not gonna squeeze out the sides when we go to take a bite.
-Right.
-So we're starting with marshmallow creme.
-Love it.
-It's the cooked sugar.
It's the beaten egg whites.
It's everything that a buttercream starts with, but we can cut out all of those tricky steps.
-I love it.
-And we found that the Fluff brand gave us the firmest texture.
So I have 5 ounces, or 1 1/4 cups, of Fluff.
I'm also adding 3/4 of a cup, or 3 ounces, of confectioners' sugar.
-Helps with thickening just a little bit.
-Right.
And we could cut back a little bit with butter, again, to keep it from becoming too soft.
So this is 6 tablespoons of unsalted butter that I've softened a bit.
-Okay.
-And now we want to add some flavor.
So we have 1/2 a teaspoon of vanilla extract and then a 1/4 teaspoon of table salt.
All right, so I'm gonna process this for about 30 seconds until it gets nice and smooth.
Just give it one scrape.
It's really soft and fluffy, and it's very nice to work with.
Okay, now I'm gonna transfer this to a bowl just to make sure that any sugar that we didn't incorporate gets incorporated.
-Okay.
[ Chuckling ] -You can taste it already, can't you?
So you can see there's a few streaks of confectioners' sugar, so I'm just gonna work those in.
-Wow.
-So I've flipped over half of our cookies.
And if you could help, I'm gonna scoop, and you can start spreading.
-Oh, great.
Okay.
-And then we'll sandwich.
-Perfect.
-Okay?
So I'm using a scant tablespoon.
Fill it, skim it.
I love little offset spatulas.
They are so handy.
I love to use the offset spatula because you can kind of, just like you're frosting a cake, kind of start in the center and smoosh it out.
And between the softness of the cookie and the stiffness of the frosting, it's not gonna spread very much.
So you can go just about to the edge.
All right, I have a little extra, so I'm just gonna dab a bit more on some of these.
I think we're ready to sandwich.
-Yay!
-Now, this is very difficult.
-[ Laughs ] -There's a real technique involved.
I have picked up a cookie, and I'm going to place it perfectly on the top of another cookie.
-Mm.
-That is all.
-That is genius.
-[ Laughs ] Even if you press on them, that filling's not really going anywhere.
-Oh, these are adorable.
-Aren't they so cute?
Let's just clean up a little bit.
-Okay.
-And then we can try them.
-Great.
These are very precious.
-They're so cute, and we did them together.
-That was the best part.
-I love it.
Well, I think you should try.
-All right.
-Now, do I break?
Do I bite?
-I know.
-Did you have a way to eat them?
-I do think I broke them apart right in the center no matter what.
You can still do that.
-Oh, my goodness.
-The molasses and the brown sugar.
It created this really crackly top.
-Mm-hmm.
-And you know what I'm gonna say.
There's something else in there giving a little bit of sweetness.
-I will take my raisins this way.
-Mm-hmm.
-If I don't see them and -- and get the texture.
I also think the salt is just perfect in these, because this is a cookie that could go way too sweet, and the salt kind of reels you back.
And that, with the brown sugar, is just caramelly goodness.
You can pack them in an airtight container, and they'll stay good for about three days.
-These are absolutely brilliant.
I love the way that it came together.
It was fantastic baking with you.
I expect nothing less from Little Christie.
-Thanks, Bridget.
-You've got to try these oatmeal creme pies at home.
They're so good.
And all it takes is grinding oatmeal and raisins in a food processor.
Use plenty of baking soda and a very hot oven for crackly tops.
And fill the sandwich cookies with a marshmallow creme and butter filling.
So, from "Cook's Country," the nostalgic and brand-new oatmeal creme pies.
You can get this recipe and all the recipes from this season, along with product reviews and select episodes.
And those are on our website, CooksCountry.com/tv.
Mmm.
All right, I'm thinking $10 a pop.
-At least.
-Visit our website, where you can sign up for the free "Cook's Country" e-mail newsletter, for even more of the recipes and stories you love from the magazine and the TV show.
CooksCountry.com/Cooks.
Want more "Cook's Country"?
Subscribe to Cook's Country magazine.
Every issue includes guaranteed fail-proof recipes, on-the-road stories, eight Dinner Tonight recipe cards, trusted reviews, and more.
Get one year of Cook's Country for $19.95.
To subscribe, visit cookscountry.com/TVSubscribe.
-Funding for this program has been provided by the following.
-Monument Grills, offering innovative technology and design for the grilling enthusiast.
With a lineup of gas grills to suit every level, our mission is to ignite your passion to pursue the art of grilling.
Learn more at monumentgrills.com.
♪♪ ♪♪ ♪♪ ♪♪ ♪♪ ♪♪


Support for PBS provided by:
Cook's Country is presented by your local public television station.
Distributed nationally by American Public Television