Painting with Wilson Bickford
Wilson Bickford "Snowy Owl" Part 2
Season 7 Episode 3 | 26m 38sVideo has Closed Captions
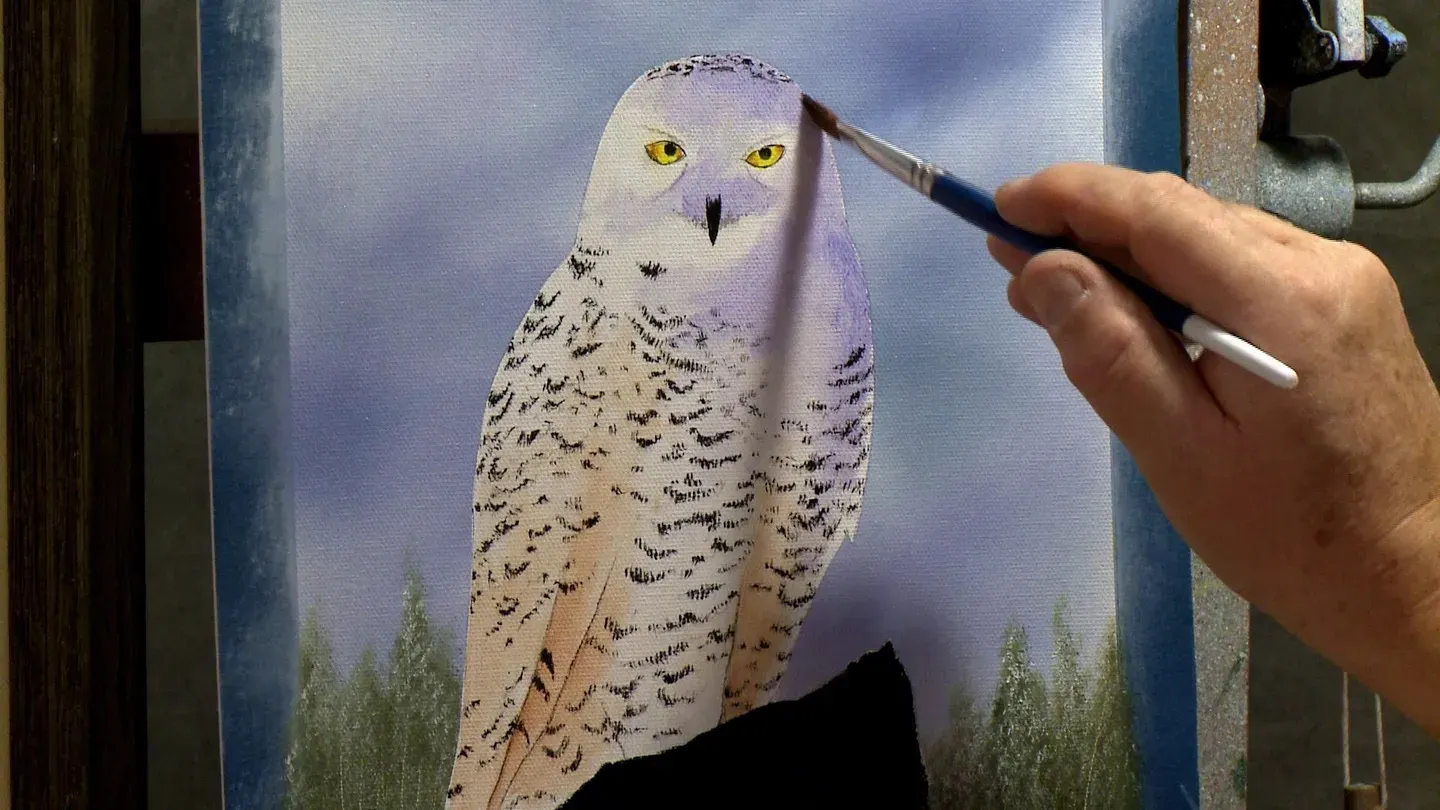
Wilson details the owl and his perch and a tree stump coated in snow.
Wilson loves to paint birds, and this Snowy Owl is on the prowl! In part 2, Wilson details the owl and his perch and a tree stump coated in snow.
Problems with Closed Captions? Closed Captioning Feedback
Problems with Closed Captions? Closed Captioning Feedback
Painting with Wilson Bickford is a local public television program presented by WPBS
Sponsored by: St. Lawrence County &nbps; &nbps; The Daylight Company &nbps; &nbps; J.M. McDonald Foundation
Painting with Wilson Bickford
Wilson Bickford "Snowy Owl" Part 2
Season 7 Episode 3 | 26m 38sVideo has Closed Captions
Wilson loves to paint birds, and this Snowy Owl is on the prowl! In part 2, Wilson details the owl and his perch and a tree stump coated in snow.
Problems with Closed Captions? Closed Captioning Feedback
How to Watch Painting with Wilson Bickford
Painting with Wilson Bickford is available to stream on pbs.org and the free PBS App, available on iPhone, Apple TV, Android TV, Android smartphones, Amazon Fire TV, Amazon Fire Tablet, Roku, Samsung Smart TV, and Vizio.
Providing Support for PBS.org
Learn Moreabout PBS online sponsorship- In the last episode, we underpainted the owl and post and rendered the background.
Join me next on, "Painting with Wilson Bickford," as I bring snowy owl to life.
(relaxing upbeat music) - [Announcer] Support for "Painting with Wilson Bickford" is provided by the J. M. McDonald Foundation, continuing the example modeled by J.M.
McDonald by contributing to education, health, humanities, and human services.
Sharing since 1952.
Online at jmmcdonaldfoundation.org.
(soft upbeat music with snapping) - [Announcer] In rural New York State, bordered by the St. Lawrence river and the Adirondack Mountains is a sprawling landscape with communities that offer self-guided tours for the creatively-inclined.
Learn the stories behind the barn quilt traditions, family agriculture, nature, and beauty.
St. Lawrence County, life undiscovered.
- Hi, welcome back.
As you'll recall in the first episode when we started snowy owl, we did the underpainting stage.
We taped him out, I dropped in the background, removed the tape, and I have now applied the clear glazing medium over the top.
We rendered his eyes and now we're ready to move on and start detailing him, putting some of the shadows and a form on him.
So I wanted the sense that the light's coming from the left.
You'll notice that the stump is lit, highlighted on the left-hand side and he's a little lighter on this side overall, darker on the right.
So we're gonna play that up and stick with that plan.
I'm gonna use the number six small flat brush and I'm gonna take a very, very, very weak mixture of some of this clear glaze.
I've already got glazing medium on but I'll just lubricate my brush here just a little bit with a little more of it.
I'm gonna take a little touch of the Burnt Sienna, not much, I want it very weak.
A glaze is nothing but a transparent wash of color, so I want it very transparent.
Now see, there's not much tone to that, not much tint.
I'm gonna try it and if it's too strong, I can actually just wipe some off.
Okay, I'm gonna start with that and I'll probably build up a little stronger in a couple areas.
Like I said, these birds are predominantly white but they have other colors in them.
And you take any white, white furred animal, they're not really always pure white.
And this is just some of the underlying tone that's in those feathers.
Notice I'm scrubbing this color on very thin.
It's not clouding the black markings of the feathers that we have on with the acrylic.
It's a very easy process.
Like I said all along, once you get the underpainting in everything else falls together really easily.
(paint brush scrubbing) So I'm gonna bring this across like that.
You'll probably, actually, maybe if you listen closely, you can hear my brush scrubbing.
I'm using very little paint and smudging that around.
I'm gonna start with this tone.
You'll notice there's darker tones in there as well.
I'll build up to that.
(paint brush scrubbing) Okay, maybe something like that.
I'm gonna take just a little more of that color, little stronger this time so it's a little bit darker.
Now, that's way too dark, I can tell.
This is like working with watercolor.
If your color is too dark you simply add more glazing medium to it to thin it down, and it makes it lighter.
You wouldn't wanna add white.
If I add white to this color and I apply it over these markings, it's gonna cloud them and you're not gonna see the black markings so I have to keep this transparent.
Remember, a glaze is always transparent.
And if you get it too dark, you add more medium instead of white.
Okay, I'm gonna come in and increase the darkness in some of these areas a little bit just to get these layers between these folds.
That's actually part of his wing right here.
And I was working from a photo that I had when I designed this.
I've never really done too many snowy owls.
This is probably, literally, I've been painting 30 years and this is probably only the third one I've done, believe it or not.
I've done great horned owls and barn owls, and other ones, but I just don't paint a lot of these.
And I don't know why, I like them.
This is kind of maybe inspiring me to paint a few more.
I'm actually thinking about doing this one as a class project in my classes that I travel around to.
So I think my students will like it.
So, like I said, I paint all kinds of things.
I like to paint birds, deer, elephants, I just recently did an elephant.
Maybe later on in the series I'll be able to show that one to you.
Um, so that's looking pretty good.
I'm, you know, I'm trying to match that one kind of but it doesn't have to be exact.
Going with the feel.
The important part is that I'm showing you how to do it so you know how to achieve it.
Okay, I'm gonna rinse this brush out and I need to take something more purplish, bluish for the shadowed side over here.
(paper towel rustling) Notice that there's some white areas still left around the beak, around the eyes.
Those are already there so if I just paint around them, it's good to go.
I could come in, yes, and put white paint on, but I really won't need to if I'm careful as to where I apply that.
So I've swished this brush out, washed it out, and I'm gonna take some glazing medium with a little touch of the Ultra Marine Blue, a little speck of the purple.
The purple is very, very, very strong.
And like before, the best thing to do is come up and just try it and see what you think.
And that's working but I'm gonna go just a tad darker, just a spec more blue, spec more purple.
Now, if you chose to, if you didn't want it quite so bluish-purple, you could gray it down with a little speck of black.
That's your option.
Everybody paints differently.
And probably most, you know, by watching me before, blue is my favorite color, I say it all the time.
So I'm not afraid to put some blue in here a little bit or a bluish-purple.
But to each his own.
Notice this comes down the side a little bit and in here and it kind of blends into some of that Burnt Sienna wash too.
So I just wanna bring those together a little bit.
There's white underneath his beak.
See, I can go right over that black beak and it doesn't cloud it at all because my glaze is transparent like it should be.
And I'm just looking at this again as a reference, just like I looked at the photo when I painted that original.
So I'm just kind of mimicking that, putting it where I see it, more or less.
You know you can do this.
I know you can do it.
I've got faith in you, you just need faith in yourself.
Everybody can paint.
I really believe that everybody can learn to paint.
Most people don't ever get a chance to try.
The majority of people are intimidated and afraid to try.
I have so many people tell me, "Oh, you have a talent.
"I wish I could paint."
My only talent is that I have always had the desire to want to and I worked at it.
That's my talent, as is for most people.
It's a lot of work, you know, for me to get to this point.
But if you're just gonna paint occasionally at home, not everybody's gonna be a professional artist, I realize that, but you can take it as far as you wanna go with it.
I never really thought I would end up being a professional artist, it just kind of happened.
But once I got hooked on painting, I figured out it was my passion and I wanted to keep doing it.
All right, that's coming together pretty well.
I'm going to darken certain spots a little bit, just like I did with the Sienna.
Remember I started lighter?
I built up a little darker.
It's easier to go in baby steps.
So I'm gonna take a little more blue, little more of the purple, and it looks pretty strong.
So I'm gonna wipe some of that off the brush and add more clear to it, just to dilute it.
And this should be a little darker.
All right, bingo.
All right.
♪ B-I-N-G-O ♪ That's for the lady who called me last week and said, "I love watching your show and I love when you sing."
Okay.
♪ B-I-N-G-O, B-I-N ♪ This is for you, ma'am.
♪ B-I-N-G-O ♪ ♪ B-I-N-G-O ♪ ♪ And Bingo was his name-o ♪ All right, here we go.
I'm gonna come down the side here a little bit like this.
And see, you wanna anywhere there's a transition there from one color to the next, you wanna just smooth out the lines so there's not a hard edge.
He's a round-headed owl, not a square-headed owl, so everything needs to look nice and rounded.
That's pretty much getting us there.
Maybe a little darker over here, underneath.
And speaking of darker, I was analyzing this when we were in between episodes from the first show to this one.
I noticed that I've got darker shadows here and a few more of them in the snow, so we'll address that too.
We'll put some of those in.
Painting is nothing but a series of adjustments.
So you're always just kind of scrutinizing it and looking at it.
Sometimes a third eye really helps, somebody else will point it out for ya, and that's good.
Sometimes you won't see things that other people see.
So it's always handy to have a fresh set of eyes look at it.
'Cause our camera lady, Tracy, caught that and pointed it out to me.
Thank you, Tracy.
Okay, I'm gonna go back to my number 10 flat that I had originally way back when, when we put the clear on.
I'm gonna address that right now that I'm thinking about it.
I'm gonna take a little bit of this darker sky tone that I had on my palette earlier.
And if it's too dark, you just simply add white to it.
This can be opaque, it's not a glaze anymore, so you can add white to lighten it rather than just glazing medium.
And this has got a little bit of the purple tone in it for my sky.
Now, the only issue is I've got the tape taken off the stump, which is fine.
I can paint around that pretty easily.
If I get a little bit on the stump, it doesn't matter.
I'm not worried about it.
I'm gonna darken that down and there's a couple extra shadows up in here like little divots in the snow, unevenness where you got unevenness in the lay of the land.
It kind of fills that in a little more and gives it a little more visual interest which is always good.
That was a good catch.
All right, maybe just a tad darker down here in the corner.
Okay, we gotta get started on that stump.
Gonna soften that out a little bit.
So I'm gonna rinse this brush out.
I'm gonna mix up a kind of a grayish, brownish, wood grain color.
Now I'm done with this Burnt Sienna right here on my palette, so I can just mix it right on that same spot just to save room on my palette.
I'm gonna take some Burnt Sienna, a little bit of black, probably a little bit of white.
And like I said, I'm looking for something that to me looks like a wooden stump tech, wooden stump color.
I almost said wooden stump texture but I'm thinking texture 'cause I'm gonna put this on in a textured way.
And you can hold it up here and check it just to see.
Notice it's lighter over here.
I'm going to put it in first with one tone, then I'm gonna re-highlight and brighten it on that one side.
So I'm gonna chisel the brush like this, bring it to a nice sharp, sharp point.
That's what I say.
This synthetic brush will hold a nice, nice razor-sharp edge.
And here's what everyone does, I'll show you what not to do.
When I come in with this brush, I'm going right straight in and flush on this canvas like this.
And notice how I can keep the lines thin.
As I press down harder, I can widen them out a little bit so I get an uneven line.
You want wide, skinny wide, that sort of thing.
Most people will take this brush and immediately turn it like this and then start.
And see, it gets too fat right off the start so too fat off the bat.
That rhymed.
But see, you don't wanna do that.
Leave it the skinny way.
Go right in flush.
That feels pretty dry to me so I'm gonna add just a little touch of that medium to it too.
You could even dip in and get just a couple drops of paint thinner.
Okay, here we go.
And I'm gonna let the black do its job.
Notice that a lot of the black shows through in the little crags in between everything.
That's important.
That's why we painted it black.
You want the shadows in there.
We're just adding mid-tones and highlights from here on out.
See how imperfect I'm making it?
I'm not trying to make it perfect and put lines perfect, straight lines like lined writing paper.
It's wood grain.
It doesn't have to be so precise.
Have some fun with it.
Loosen up a little bit.
Get out here on the outer edge a little bit.
And I'm gonna put them kind of tight together but like I said, I'm gonna leave some of that black in there to do its job.
Right now it's still looking pretty flat.
It's gonna have more form once I put the highlight on.
And see, this owl was sitting just over the edge of the stump where I didn't have to worry about showing his toes or his feet so we're gonna have snow piled up on the top.
That makes life easy.
All right, now I'm gonna build up lighter so I'm gonna take the same brush with white and a little more Sienna.
And on that left-hand side is where I wanna have the light coming from.
So I'm gonna start over here and I'm gonna start lightening this up.
I might do this two or three times to get it to the level of lightness that I want.
I'm just gonna keep looking at it, analyzing it, and I'll know what I want when I get there.
It's like walking into an antique store.
My wife and I like to visit antique stores.
I go in there with no particular plan but if something reaches out and grabs me, I know it when I see it.
It's the same with this.
I build it up till it looks good to me and once I'm there, I know it.
All right.
It's looking pretty good.
I hope you give this a shot.
This is a fun one.
The owl is on the prowl.
I'm gonna go just a tad lighter.
I'm gonna take a little more white into that mixture.
Watch this.
I can even put just a speck of yellow.
I don't wanna get it too yellow.
I don't want it to look like the Sun shining 'cause it looks very overcast, but I'm gonna warm it up just a trifle, just a little bit.
And I'm gonna go even a little lighter and brighter on this one edge.
The whole idea is I want that stump to look round.
And as it goes to the shadowed side and wraps around, let your brush run out of paint so it just becomes less and less and less and it'll just slowly taper away.
You'll be right in business.
That was pretty easy, don't you think?
Yes, you could do that.
I know you can.
Okay, that's looking pretty good.
And I'm just analyzing it.
This one looks a little darker on this side.
Gives me more contrast against the snow on the tree so maybe I'll darken that back down.
I may have put a little bit too much of the mid-tone there and not left enough, quite enough of the black.
So it's an easy fix.
I can actually just take a little more black and I can come in and redefine that edge a little bit just to make sure it pops.
All right.
There.
Nothing but a series of adjustments, that's all painting is.
I'm gonna rinse this brush out.
(water swishing) Get all the dark color out of it.
Like I said before, this is just odorless mineral spirits that I use to clean my brushes.
I'll wipe that off.
(paper towel rustling) I'm gonna take some of this blue and white color that I had on my trees way back when, that shadowed snow color.
I need a little more of it.
So I'm taking the Titanium White and Ultra Marine Blue, maybe a little bit of this medium to thin it down a little bit.
I got quite a load on my brush here.
I'm gonna put this on with a bluish tone first which isn't gonna show all that well, but then I'm gonna add white to it.
Even though it's just snow on top of the stump you want some shadow in it.
I'm laying it on.
Notice I'm patting it with the brush kind of flat and it gives me an uneven, scallopy edge down below.
Now, this stump could have a half an inch of snow on it, it could have two inches of snow on it.
You have to decide how much you want.
I'm gonna wipe the brush off and take straight white now.
And I'll lay that on the top and I'm not afraid to leave a little bit of texture in it so it looks a little bumpy.
I added a little bit of the clear medium to that just to kind of thin it down so it sticks a little easier.
All right, it's coming along pretty good.
I can actually use some of this white base coat too, this is even thinner yet.
And see how I scoop it right up?
So I can lay it on quite liberally and really get it on there.
All right, I've been thinking about this.
Ever since I designed this project, I was wondering if we were gonna have time enough to squeeze this in on air or not, but I think I got just enough time.
I'm going to take this same brush.
Now, this pretty much at this point is done from what that one was.
I'm just adlibbing now because I got a couple minutes to burn up for you.
So I'm always hoping I can add something in at the 11th hour.
So I'm gonna take the same brush, I wiped it off.
So this is an option, you don't have to do it.
I'm gonna take Burnt Sienna, maybe a little bit of black, some of this white base coat.
You can use the Titanium White, you just have to thin it down a little bit.
And I'm gonna take some of this and I'm gonna say maybe there's some dead winter grass kind of sticking up around the stump.
It kind of helps fill in, give it a little more visual interest.
And again, it's just like I did the lines in the stump, I'm using the chiseled edge.
And see, if I pull up and I press down a little harder and then come back skinny, it tapers it like a blade of grass, which is pretty easy.
It's just that when I'm doing it, I'm doing it quickly but that's what I'm doing.
So that kind of helps fill in.
And there'll probably be some in front of the stump.
I don't wanna get the same value so I have to make sure it doesn't blend in with the stump, so I've lightened it a little bit.
Hope that's gonna show and read differently, and it does.
I'm using a brownish tone because it's wintertime and the grass is probably pretty much dead, so I'm not using a strong green.
See how that kind of helps fill in?
Put as much or as little of that as you like.
It's all good.
All right.
(paint brush scrubbing) There, I think that added something to it.
Looks pretty good.
Okay, and if I take a fan brush.
Now I'm really going out on a limb.
Hey, when's the best time to buy a bird?
When he's going cheap.
(Wilson laughs loudly) So I'm gonna take this.
This, it looks a little chunky to me.
I'm just gonna smooth it out with my fan brush, get some of the ridges out of it.
I don't want it to look quite so ridgy and linear.
It's snow so I want it softer and round.
So I can calm that down a little bit with my fan brush.
I'm gonna take some of this white base coat.
I have some still laying on my palette here.
So I'm gonna take some white base coat and I'm gonna add a couple drops of thinner to this.
(paint brush tapping) And I'm going to spatter.
If you're not familiar with spattering, spattering is a great technique to know about.
I use it a lot.
I'm gonna use it for falling snowflakes in this painting right now.
Now, if you like it the way it is, you certainly don't have to do it.
This one doesn't have it.
I'm adlibbing.
So if you like it like this, you're done.
Stop.
I'm gonna show you how to do it.
Spattering, you can use it for flowers in a meadow.
If you use colors, you know, like reds, pinks, whatever, orange, yellows, it looks like flowers in a meadow.
You can use it for gravel on a road.
If you have a big crashing ocean wave which I'm gonna show you later on in this series, you can use it for the spray-off coming off the foam.
It's just random dots is all it is.
So you wanna get it thin enough like this.
I'm gonna have the camera tighten in right here against this dark spot on my palette.
The idea is to pull the bristles back and let them snap forward like this.
You get that random spray.
The key is the right consistency.
If your dots are really, really small it means your paint is just a whisker dry, add a couple more drops of thinner.
If they're too big, it's too thin, you'd wanna add more paint to thicken it up.
So you'll have to experiment on your palette to see what you're getting.
I'm thinking that's gonna be just about right for the consistency I want.
I'm gonna try not to get that frame over there.
I'm notorious for filming and spraying my finished painting, getting my frames ruined.
So see, I'm just gonna put a little random spray here so it looks like there's a light snowfall coming down, which kind of ties in with the overcast look.
If you started way back when and I told you you could just do a plain blue sky, nice pretty day, you probably wouldn't have any snow.
But this kind of ties in with the mood that I've created with the overcast, gloomy, blustery look.
And don't be afraid to get some right on the owl itself.
He's gonna have some in front of him and you're gonna have to decide whether you want a raging blizzard or just a light snowfall.
I think that's gonna do it for me.
I think that completes that.
All right, I'm gonna go off camera and take this tape off and I'll be right back.
I've removed all the border tape to reveal the finished product, and look what we got.
Came out pretty nice, don't you think?
I'm so glad you joined me for this.
I'd love to see your version of it.
Send me a photo on Facebook or through my website, WilsonBickford.com.
I'd love to see what you do with it.
Until next time, stay creative and keep painting.
(soft relaxing music) - [Announcer] Support for "Painting with Wilson Bickford" is provided by the J.M.
McDonald Foundation, continuing the example modeled by J.M.
McDonald by contributing to education, health, humanities, and human services.
Sharing since 1952.
Online at jmmcdonaldfoundation.org.
(soft upbeat music with snapping) - [Announcer] In rural New York State, bordered by the St. Lawrence river and the Adirondack Mountains is a sprawling landscape with communities that offer self-guided tours for the creatively-inclined.
Learn the stories behind the barn quilt traditions, family agriculture, nature, and beauty.
St. Lawrence County, life undiscovered.
- [Announcer] All 13 episodes of "Painting with Wilson Bickford," season seven are now available on DVD or Blu-ray in one box set for $35, plus 4.95 shipping and handling.
Or learn the techniques used to paint Sunset Lake with the in-depth "Paint Smart, Not Hard" series of Wilson Bickford instructional DVDs.
Includes the bonus episode, "Don't Be So Coy."
Additional titles available.
Order online or watch or download directly to your computer or mobile device.
More information at wpbstv.org/painting.
(soft upbeat music) (relaxing upbeat music)


Support for PBS provided by:
Painting with Wilson Bickford is a local public television program presented by WPBS
Sponsored by: St. Lawrence County &nbps; &nbps; The Daylight Company &nbps; &nbps; J.M. McDonald Foundation