Painting with Wilson Bickford
Wilson Bickford "Making an Impression" Part 2
Season 8 Episode 5 | 25m 46sVideo has Closed Captions
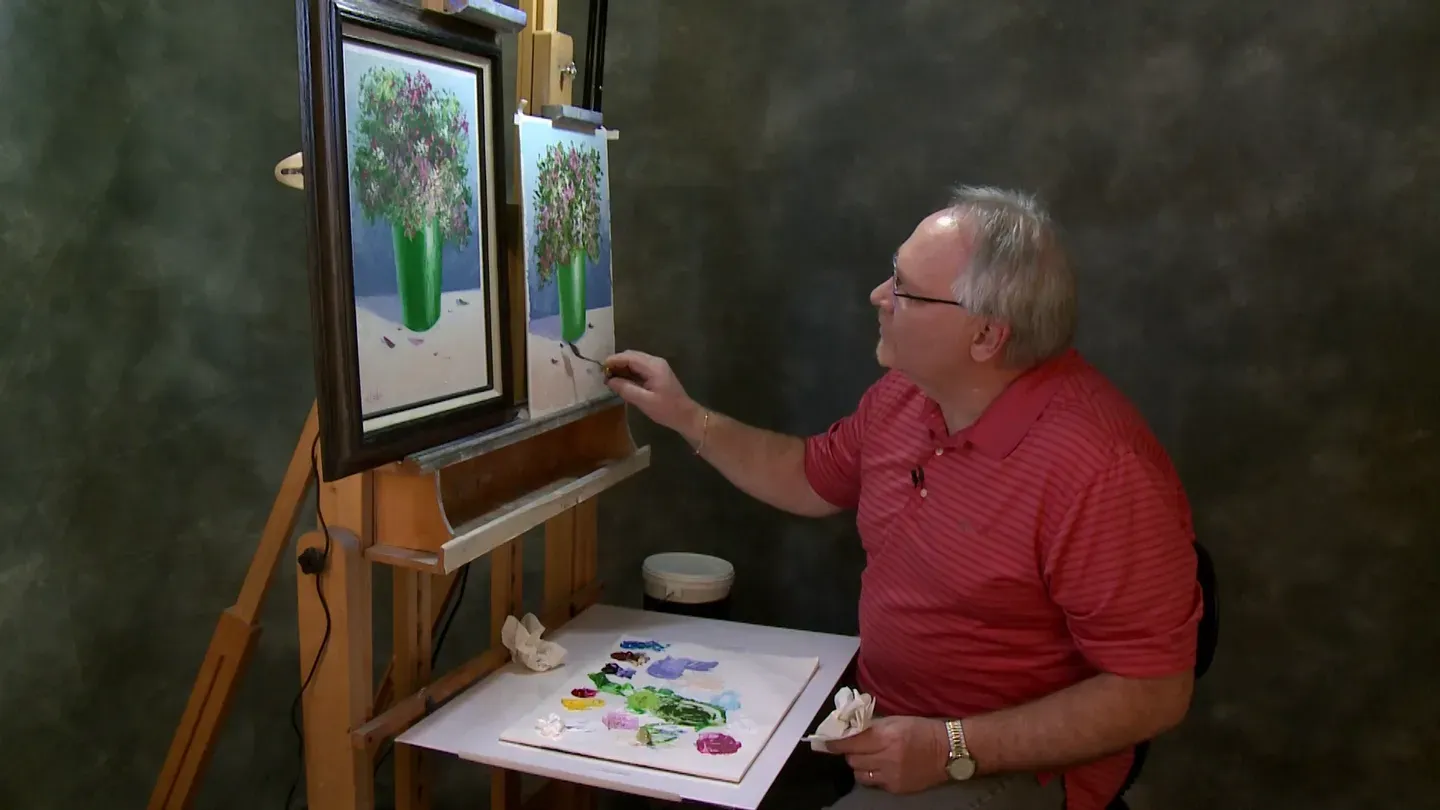
In Part 2, Wilson finishes the vase and adds a bouquet of vibrant blooms.
Wilson uses only a painting knife to create a vase full of colorful flowers. In Part 2, he finishes the vase and adds a bouquet of vibrant blooms.
Problems playing video? | Closed Captioning Feedback
Problems playing video? | Closed Captioning Feedback
Painting with Wilson Bickford is a local public television program presented by WPBS
Sponsored by: St. Lawrence County &nbps; &nbps; The Daylight Company &nbps; &nbps; J.M. McDonald Foundation
Painting with Wilson Bickford
Wilson Bickford "Making an Impression" Part 2
Season 8 Episode 5 | 25m 46sVideo has Closed Captions
Wilson uses only a painting knife to create a vase full of colorful flowers. In Part 2, he finishes the vase and adds a bouquet of vibrant blooms.
Problems playing video? | Closed Captioning Feedback
How to Watch Painting with Wilson Bickford
Painting with Wilson Bickford is available to stream on pbs.org and the free PBS App, available on iPhone, Apple TV, Android TV, Android smartphones, Amazon Fire TV, Amazon Fire Tablet, Roku, Samsung Smart TV, and Vizio.
Providing Support for PBS.org
Learn Moreabout PBS online sponsorship- Did you hear about the two flowers that started dating?
It was a budding romance.
Join me next right here on "Painting with Wilson Bickford," and I'll share my knife painting techniques for making an impression.
(calm music) - [Announcer] Support for "Painting with Wilson Bickford" is provided by the J.M.
McDonald Foundation, continuing the example modeled by J.M.
McDonald by contributing to education, health, humanities and human services.
Sharing since 1952.
Online at jmmcdonaldfoundation.org.
(upbeat music) - [Announcer] The View Center for Arts and Culture is an Adirondack exhibition and performance space featuring in-person and online classes for creatives of all ages and abilities.
Open calls, events, and class schedules online at viewarts.org.
- Hi, welcome back.
The is part two of "Making an impression."
As you recall, last week, we based in the background and the table surface here, and I was just starting to fill in the vase.
So I'm gonna continue doing that.
I've put the white highlight in there, and I'm gonna bleed some color into that here eventually.
Now right here, these edges, the knife is square, the lines are square, so it's a pretty easy process.
But I do have to buckle down and just be careful.
Make sure I have a steady hand, and just hit that edge.
I'm gonna come back with a little bit of a reflected light.
You'll notice on the left-hand side, there's a bluish cast that is reflected light on the vase.
I'm gonna put that in there.
The dangerous part of this is down here on this curve.
There's no way I can do it.
And I know it, I've been through this many times.
I know I'm gonna get some of this green on the table surface, but I will clean it up and repair it.
It's no big deal.
I heard that.
Somebody in Atlanta, Georgia, said, "Well, it's no big deal for you, but I'd have trouble with it."
You won't have trouble with it.
You can do it.
I'll show you.
Okay, right here where I'm just not talking as much.
I'm holding my breath to steady my hand.
I gotta hold my tongue just right.
And I need to get down around this edge.
When I'm working around a tighter area where I need more control, I load the knife differently.
I take a little ridge right on the edge of the blade.
That way I have much more control than having it loaded fully, like I normally do.
So when I get into some of these edges, I can cut in around them, especially, particularly here at the bottom.
Anywhere where I have to finesse around something a little tighter.
I have more control.
Now see, I'm trying to keep this rounded here as much as I can.
And like I said earlier, I've been saying, this knife, I can pretty much do anything I want with, I just have to hold my mouth right sometimes, and hold my breath.
But I can finesse it.
They have a lot of different knives out there to use.
Maybe you'll find one that works better for you for this, but...
Okay, now see, this is a little greenish in here.
I'm gonna wipe the knife off, get some of the excess paint out of it.
I want bleed a little bit of green into that white.
I don't want it.
I want it lighter, like a highlight, but I said earlier, I want the brightest right there, up near our flowers.
So I'm gonna just bleed a little bit of green into this.
And because the vase is vertical, I'm kind of blending vertically this way.
You'll have to wipe your knife off every so often.
Now wanna soften these edges a little bit so I'm gonna go right into the white, and kind of work it out into the green.
I just want that nice, bright shine on there.
See, it's starting to come together now.
Sometimes you have to squint at it to see it.
So I got my eyes half-shut right now as I'm doing this.
Okay.
Well see, again, I say this all the time.
I tell my students just to relax a little bit, put paint on, push it around 'til it looks good.
That's all I'm doing here.
See, I just keep working it until it looks good enough where I can live with it and I'm happy with it.
And I say, that's close enough.
I'm gonna take a little more white so I got something to work with here, and pull down.
That's all it is, is just pushing the paint around 'til it looks good to you.
And everybody's gonna have a different threshold of what looks good and what doesn't.
You're gonna have to be the judge of that.
When I knife paint, I certainly am not striving for perfection.
Like I do more so when I brush paint, even when I brush paint, I'm not necessarily looking for perfection but I definitely want a tighter, more true representation of whatever it is I'm trying to duplicate on canvas.
See, that'll give you the idea, something like that.
I mentioned earlier that we need some reflected light on the back of that.
So I'm gonna come in with white and some cerulean blue.
I want kind of a bluish tone, like something is reflecting back onto the side of that.
I'm gonna take white, cerulean blue, and a little bit of butter.
And again, just like I mentioned a moment ago, I load the knife differently now.
I'm gonna take it like this and get a little bit right on that top edge, 'cause I'm going to the left-hand side with it.
So I wanna have it on this side of my knife.
I'm gonna put this reflected light.
You're gonna pick up a ton of green as you do that.
That's why I keep wiping the blade off.
And then I need to blend it a little bit.
Let the two edges hold hands a little bit.
See, that lends a little more roundness to the vase.
It makes it look like you're getting light bouncing on the back side of it.
Okay, that's not too bad.
Down here, it doesn't look quite as round as I would like it.
So I need to come in, and I'm gonna take a little bit of paint right on the tip of the knife.
And I'm gonna round this off a little bit, and then we need to sneak just a little sense of shadow underneath it.
Let's see, I'm really finessing here.
If I get some down below on the table surface where I don't want it, I can clean it up, scrape it out.
Knife painting is probably the easiest type of painting to fix because we're using so much paint.
Something's causing grief, you just literally scrape it off.
Easy to repair.
Okay, that's a little rounder.
I think it's round enough where I can go with it.
Now see right here where it's a little ragged edge?
I'm gonna take the knife, nothing on it.
And if I just go right into that table color and just kinda saw through I can clean that up for the most part.
If not, I'll have to put a little bit of that table color over it.
I think that's gonna do it by the time I put the shadow in it.
I think I'm there.
All right, I'm just looking at some of these bumps here, and I'm just smoothing everything out.
Finessing, pushing it around 'til it looks good.
I keep saying it.
Okay, I'm gonna go back to this shadow color that I had, the darker version.
Remember I lightened it a little bit against the background edge.
I'm gonna take some of this darker color.
Again, right on that little edge.
Right here I'm just gonna lay a little bit of a darker cast shadow underneath the vase.
And I gotta smooth it out.
Looks a little rough, but I'll smooth it.
Somebody in Detroit, I heard you.
You said, "Boy, you gotta smooth that out, Willie."
I'm getting there, I'm getting there.
Okay, then wipe the blade off.
Nothing on it, and if I just lightly drag through there, I can soften that down a little bit.
If the edge looks the little rough against the table, just like I did with the green, I'm gonna come in like this and just push against it and saw that off a little cleaner, if I can.
Notice how often I keep wiping the blade.
Got a little smudge here.
I'll scrape that away and clean that up.
All right.
Not too bad, but that'll show you how to do it.
That's how I do it.
You're gonna have to just grab the reins and go for it.
Gonna push that edge in a little bit.
This looks really square here so I need to reshape that and shave that edge off a little rounder.
I can actually take some of my table color, put back in there to help that along.
Okay, it's not perfect, but it's close enough.
Close enough to give you the idea for this lesson at least.
I can come back and tweak that later.
'Cause we got some flowers we gotta plant here.
(upbeat music) Don't limit at yourself to just painting on canvas.
If you look around at some of the craft stores, you'll find other surfaces like this.
This one is done with knives, but sometimes I paint with brushes on such a thing.
These are really nice.
They're very different.
They're very popular with my customers.
You'll find them in all kinds of various sizes, and sometimes even shapes.
And there are many options out there.
These are very popular with woodburners, but I've painted on them myself.
And they come in all kinds of shapes and sizes.
Okay now, for the cluster of flowers, I'm actually just gonna put some green background in there for all the leaves and whatnot.
This is going to amaze you.
This is so easy.
And everybody looks at that and they don't know where to start.
This is where you start.
I'm actually gonna take some of this same green I used for the vase.
I need to mute that down to more of a believable leaf color.
So I'm gonna put some burnt sienna.
Burnt sienna is a good color to cut that green with because it has red in it.
It's actually a dark orange, burnt sienna, so it has red in it.
Red is the complementary color to green, so I wanna really good dark green, maybe like this.
And I can compare it before I ever use it.
I can bring it up here and just check it.
I need to put butter in this yet.
So I'm gonna say maybe something like that.
I'm gonna put some butter with it, work it in.
Now this is where I'm not finessing.
I'm just gonna load for bare.
I'm gonna take pretty good amount of paint on this knife.
And if I just put this on and just lightly skim it across here and drag it.
Now I wanna kill all of the white canvas.
So in this area, I need it a little more solid.
So you'll see me, kind of really... You'll hear me scraping sometimes.
I get a excess amount here and I'll scrape it off there to move it down here, just to save paint and fill in the gaps.
Now see, I could have painted background in there, and it would've showed through here and there, but usually on a floral grouping like that you don't see the background right through the middle of the cluster anyway.
So that's why I didn't do it that way.
Now see, does that look familiar?
It probably looks a little bit like this right now.
Looks like a foamy head on a glass of beer, doesn't it?
(laughs) But see, that's too small.
So I need to bring it out.
Once I get this kind of filled in, and I'll keep working on all these little white areas.
I'm gonna do basically the same thing, but I'm kind of pulling out against the background, and notice I turn the knife different angles, and see, it just automatically happens.
What is going on here is that I have all these bumps and ridges in the background paint, so when I skim across those ridges grab the green on the knife and that's what pulls it apart into all these nice little shapes, and see, I can just come in and basically kind of dab, and look how nice that looks.
At least I think it looks nice.
For what I'm going for, for an impressionistic look, I think it looks fantastic.
It's really easy.
If I was gonna get right down to it, I would say that the vase is a much more difficult, challenging part of this painting than the flowers are, and the leaves.
And see, I'm not painting leaves.
I'm just stamping with the brush, but it really makes it in your mind say leaves and foliage.
Look how much paint I've used.
I had that great big pile of paint there, it's gone.
See, I'm laying on pretty thick and chunky right there, which is no problem, 'cause all it was was green with burnt sienna.
So it was an easy color to get again.
It's easy to find.
So I'm just gonna take some more of those two colors.
I need to put butter with it again.
And even if it didn't match exactly, that would be okay.
It's probably even better.
We are gonna put some highlight greens over the top of this.
More paint, and see, I'm just lightly skim...
I'm holding the knife flat.
I better specify that.
I'm not holding it on the side and scraping.
I'm holding it flat, and just lightly skimming, and see, it just happens, whatever pulls apart.
It's a really easy way to do this.
And these type of paintings are really popular.
I do a lot of these florals with the knife now like this, and they are really good sellers.
People really love them.
Now that I'm showing you, you can do your own.
So see, I just sit back and I look.
Now see, that's a lot better composition.
I've branched it out a little bit.
The canvas is kind of restricting me so I couldn't go too big, anyway, like the other sample I showed you on the clipboard there where it looked top heavy.
I can't really get too big, which is good.
But I wanna bring this out just enough to where it looks full.
Don't make it perfectly symmetrical.
Notice, I'm gonna pull this side up a little higher here at one o'clock and have a kind of an ear on it and I'm gonna go lower on this side.
Just don't make it perfectly round.
This one's the opposite.
This one's lower on this side and higher on this corner.
It doesn't matter which way you go with it, just don't make it a round, perfectly symmetrical shape in there.
I'm gonna let some of these hang down on this side a little bit.
Look how easy that is and how good it looks.
Now I need to overlap the vase a little bit and tuck that in.
So I come in like this and drag some right over the vase.
Yes, I'm gonna go right over that white a little bit.
I'll wipe this off, and I need to come back with a highlight color to highlight the leaves.
(paper rustling) So I'll start with a little bit of white, little bit of the green, some of the cad yellow pale.
Go light enough and bright enough that it's going to make a difference and be noticeable.
I need to put some butter with that.
My butter's got green in it, but that's okay, 'cause my mixture's got green in it right here.
And like I said, I can compare this before I'm ever committed.
I think that's gonna do it.
Again, it's the same thing.
I'm just lightly going to skim.
I'm just barely touching the canvas.
You'll feel the stickiness of the paint below, and it just grabs that paint off your knife.
You're probably not gonna believe this, but guess how I'm gonna do the flowers?
Same exact way.
You got it.
They're impressions of flowers.
There are nothing really too specific.
See, just like that.
We have our leaf cluster in, and then I'm gonna wipe the knife.
I'm gonna take some red rose deep, little bit of white, not much.
And I'm using red in this.
You could put purple flowers.
You could put blue flowers.
You could do anything you want.
I'm just showing you the technique.
I'm gonna go darker with this first color 'cause I have intentions of putting a lighter tone over the top.
And just like I did before, I'm just barely grazing the canvas.
So see, the paint's on the back side of the knife.
And I kinda shop it around, a little here, a little there.
It's amazing that you can get that degree of detail, really.
It's not really detailed, but yet it is.
It's detailed enough, let's put it that way.
Now see my red is getting pretty dirty here on my palette, 'cause I'm picking up green every time I'm touching that.
When it gets to a point where it's a little too dirty, I would stop and remix, but it's still working, so I'm gonna run with it, 'cause I'm gonna put a highlight over it anyway.
Now I'm gonna take more white, and a little bit of the red.
I wanna go much lighter, a fuchsia pink color, put some butter with it, load it the same way.
And here and there, I'm gonna lightly just skim over and highlight some of the red areas, and look like highlights on the flowers.
Isn't that amazing?
Look how easy that is, and I'm not really doing much of anything, but you have have to acquire the touch for it.
I'm just using a light touch, and you'll learn by trial and error how much paint you want, and how heavy of a hand you can get away with.
All right, this one, I've got some white in here.
I'm gonna take some white and a little bit of butter.
Now I could add some yellow into that yellow flowers.
I could put some purplish ones, some bluish ones.
It's all good.
I'm gonna go a little bit of white right in here in a couple spots.
It'll look like you have a different type of flower in there in the arrangement.
And I'm gonna say a few petals have fallen off onto the table surface.
So I'm gonna take some of the purple that I used for the shadows earlier.
I'm gonna put something right there.
I don't like that little spot right there.
I'll put some green in there.
So I'm gonna take some of this purple that I had for the shadows earlier, and I'm just gonna put a cast shadow like this.
The light's coming from the right to the left, we can tell.
Don't space 'em out evenly.
That's gonna be the shadow.
It's easier to put the shadow in first, and then put the petal on top and through it.
I'll put a little piece of something there, smaller.
Just don't make any pattern out of it.
And then I can play.
I can take some of, let's see, maybe I'm gonna use some green, just like this one.
I got a green leaf, I'll put a little bit of a green leaf in there that fell off.
I'll use some of the darker red once in a while.
Some of the lighter pinkish color once in a while.
And see how loose and free that it is?
You don't have to make it rocket science, and it shouldn't be, it should be fun.
I'm gonna put a little bit of highlight on these.
I'm winding right down on the clock and I've gotta go.
But I certainly hope you give this a try.
Experiment with different knives.
Do different compositions.
But this'll give you a good foundation to get started on.
So until next time, stay creative and keep painting.
(calm music) - [Announcer] Support for "Painting with Wilson Bickford" is provided by the J.M.
McDonald Foundation, continuing the example modeled by J.M.
McDonald by contributing to education, health, humanities and human services.
Sharing since 1952.
Online at jmmcdonaldfoundation.org.
(upbeat music) - [Announcer] The View Center for Arts and Culture is an Adirondack exhibition and performance space featuring in-person and online classes for creatives of all ages and abilities.
Open calls, events, and class schedules online at viewarts.org.
- [Announcer] All 13 episodes of "Painting with Wilson Bickford," season eight are now available on DVD or Blu-ray, in one box set for $35 plus 4.95 shipping and handling.
Or learn the techniques used to paint Sundown Beacon with the in-depth "Paint Smart, Not Hard" series of Wilson Bickford instructional DVDs.
Additional titles available.
Order online or watch or download directly to your computer or mobile device.
More information at wpbstv.org/painting.
(calm music) (calm music)


- Home and How To

Hit the road in a classic car for a tour through Great Britain with two antiques experts.


Support for PBS provided by:
Painting with Wilson Bickford is a local public television program presented by WPBS
Sponsored by: St. Lawrence County &nbps; &nbps; The Daylight Company &nbps; &nbps; J.M. McDonald Foundation