E20 | Westford Historic Renovation | Seeding the New
Season 46 Episode 20 | 23m 42sVideo has Closed Captions
Charlie, Kevin and Tom install a roof hatch to the widows walk.
Kevin O'Connor meets environmental abatement specialist Ron Peik, overseeing lead paint removal from the staircase. In the basement, waterproofing specialist Hugo Provetti discusses sealing the foundation from the inside. Later, Kevin and Jenn Nawada head to an apple orchard where Jenn gets a gift for the homeowners. Tom Silva, Charlie Silva_and Kevin install the new roof hatch.
Problems with Closed Captions? Closed Captioning Feedback
Problems with Closed Captions? Closed Captioning Feedback
Funding for THIS OLD HOUSE is provided by The Home Depot and Renewal By Andersen.
Support provided by:

E20 | Westford Historic Renovation | Seeding the New
Season 46 Episode 20 | 23m 42sVideo has Closed Captions
Kevin O'Connor meets environmental abatement specialist Ron Peik, overseeing lead paint removal from the staircase. In the basement, waterproofing specialist Hugo Provetti discusses sealing the foundation from the inside. Later, Kevin and Jenn Nawada head to an apple orchard where Jenn gets a gift for the homeowners. Tom Silva, Charlie Silva_and Kevin install the new roof hatch.
Problems with Closed Captions? Closed Captioning Feedback
How to Watch This Old House
This Old House is available to stream on pbs.org and the free PBS App, available on iPhone, Apple TV, Android TV, Android smartphones, Amazon Fire TV, Amazon Fire Tablet, Roku, Samsung Smart TV, and Vizio.
Keep Exploring


This Old House Insider Newsletter
Get This Old House exclusive stories, tips, and behind-the-scenes information delivered right to your inbox every month.Providing Support for PBS.org
Learn Moreabout PBS online sponsorshipKevin: Today on "This Old House"... How do you delead a 131-year-old staircase?
Call in the experts.
Jenn: And we're enjoying a New England tradition right here in Westford.
Kevin: That's right.
How do you like them apples?
Jenn: Really, Kevin?
[ Laughs ] Kevin: Oh, yeah, really.
Plenty more where that came from, too.
♪♪ Man: Ah, that's it.
♪♪ ♪♪ ♪♪ Kevin: Hey there.
I'm Kevin O'Connor, and welcome back to "This Old House," into our 1893 Colonial Revival here in Westford, Massachusetts.
The house sits right here in the center of town, and you can see Charlie's got a lot of work going on.
So the porch in the front here, that is gone and it's not coming back, we will completely rebuild it.
But Charlie did save the top rails and the balusters, so those are going to be reused and put back onto the new porch.
You can also see that the old clapboard siding has all been removed.
That was too far gone to be saved.
And the new sheathing is starting to go up.
That has got an inch of foam on the back of the sheathing, so that we have a continuous insulation layer of an R6 on the outside of this house.
The scaffolding is still here because we did quite a bit of roof work.
There was a fire here about 8 years ago, destroyed the entire roof.
You can see that that has been rebuilt.
And once it was, the original slate shingles were replaced with a new metal shingle.
It's got a great charcoal color.
And then outback here, a little extra space.
We've got a bump-out off of the basement.
You can see the new foundation wall right there.
Above it will be a wall of windows.
We hear they might use it as a greenhouse, and then on top of it, a flat roof, because there's going to be a deck, staircase coming up to it right there, just under the bay window, with access from the kitchen, through that door, right there.
And inside, well, we got another staircase to deal with.
The porch to this side entrance is being rebuilt as well, just like the front.
And this doorway takes us into the back half of the kitchen and right next to the back staircase, although not the staircase I was referring to.
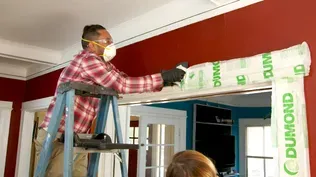
The one we're working on is the center staircase out front, right behind our little containment zone, where I'm going to meet our lead paint expert.
Are you in here?
There he is.
How are you?
Good to see you again.
Ron: Good morning.
Kevin.
How you doing?
Kevin: So obviously we're good to be in here.
You're not suited up, right?
Ron: Right.
We're on day three.
We basically cleaned it all up from yesterday.
So it's nice and safe for us to be in here.
And what you're looking at here is the foyer and the hallway upstairs.
We're restoring the wainscoting and the stairway and basically taking off a whole bunch of lead paint and bringing it back to the original.
Kevin: Containment system all set up and in place.
Ron: Right.
Kevin: Okay.
So day four, where did you start and where are our balusters?
Ron: Well, we started out by taking apart the balusters because it is about 100 of them in here.
And they were very detailed.
So we take them right off site and strip them off site.
It's easier to take care of them like that.
But everything else that can't be removed is being stripped in place and brought it right down to bare wood.
Kevin: Oh, yeah, look at that.
So the risers, these were painted.
That's down to bare wood.
These were not painted.
Ron: That was already -- Yeah, that was already stained.
Kevin: And how did you get it to that stage?
How did you attack it?
Ron: Combination.
It's more of an art than a science when you're doing -- stripping a paint like this.
So we came in here, we started with chemicals to see how those would work, started with this infrared heat gun and also tried out the normal 1,000-degree heat gun.
The chemicals didn't work so well.
There's some pretty solid lead paint in here.
It didn't have a great response.
And it would have worked but taken a little bit more time.
Kevin: Okay.
Ron: These work pretty well on the flats, but for the real detail, this with the small scrapers and wire brushes, we were able to preserve that detail and get the paint out of there much better.
Kevin: And when you say, you know, heavy lead paint, like, how much are we talking?
Like, how much lead is in this?
Ron: A lot of people think there's just a little trace element of lead in a gallon of lead paint from back in the day, but there's quite a bit.
It weighs a little bit.
Here's an indication for you.
Kevin: Oh, my goodness.
It's arm day.
Ron: Yeah, yep.
Kevin: You gotta be kidding me.
There could be 8 or 10 pounds of lead in this?
Ron: Yeah.
Kevin: So if we had just 2 gallons of lead paint on this staircase, we're talking about maybe 20 pounds of lead.
Ron: 20 pounds, yeah.
And there's a lot of -- There's a lot of surfaces in here so easily.
Kevin: That's insane.
[ Paint can thuds ] Alright, well, you guys are obviously into it.
We'll let them get back to work.
And maybe you can sort of tell me along the way what they're doing.
Ron: Sure can.
♪♪ Kevin: Let's follow along from a safe vantage point.
So starting with the heat gun.
Ron: Yeah, basically what the heat gun does is it gets -- It just softens up that paint enough you could take it off the wood without damaging the wood.
Kevin: And what temperature do you think you guys are using there?
Ron: They're running that at a 750 Fahrenheit.
And that gun goes to a maximum of 1,000.
Kevin: So we know the dust is bad.
But you're saying fumes bad as well?
Ron: Right, the higher the heat, the more fumes you have.
And those will tend to actually overload the filters.
So we don't want that, and that's why the regulations max you out at 1,100 degrees Fahrenheit.
Kevin: It's remarkable to think that you've got, you know, 7 or 8 days on site, plus the work with the balusters off site... Ron: Right.
Kevin: ...to get this whole thing mitigated.
Ron: Yeah.
It's artwork.
Kevin: Well, it's hopefully worth saving because it's a beautiful staircase.
It's the signature feature of this house.
Ron: You could not recreate this in modern day, in less time than it takes to strip it and to restore it.
So it's -- It's just we -- we just love bringing back the old -- the old surfaces.
If we can keep those architectural elements, they're the fabric of the house.
They're the history of the house.
It gives us great, great satisfaction in saving that.
Kevin: Yeah, well, it gives us good satisfaction having you guys working here for us.
We appreciate it, Ron.
Always good to see you.
Ron: Good to see you, too.
Kevin: Thank you.
♪♪ Kevin: Charlie, last time I was here, this was just a dirt floor you were digging into.
You are coming a long way to the finished basement we're shooting for.
Charlie: Yeah, we're getting there.
And this was an unconditioned, damp basement when we got here.
Kevin: It was nasty.
Charlie: It was very bad.
So we took it all out, excavated down about 16 inches, compacted the grade.
We installed a perimeter drain and then put about 8 inches of crushed stone and compacted that on the top.
Kevin: Wait.
So I get the stone part.
No plastic, no vapor barrier, no sand and all that stuff?
Charlie: No, we're doing that all above our crushed stone.
And right over here is our closed-cell foam that we will spray onto the crushed stone, and we wrap it up right up to the side of the outside wall.
Kevin: So what does this represent?
Charlie: This represents our concrete floor.
And what you see here is our secondary line of defense for our waterproofing.
Kevin: So drainage mat which we've seen before usually on the outside.
You get any water behind it, it runs down.
And I guess it's going to be picked up by your perf pipe.
Charlie: That's right, but it's going to go all the way to the top to the underside of the joist.
So any moisture behind it is going to drip right behind all this and get into our perimeter drain.
Kevin: I love it.
Okay.
But why did you call this the secondary line of defense?
Charlie: Believe it or not, we're going to put our waterproofing on the outside.
Kevin: Of The foundation?
Charlie: Of the foundation.
Kevin: Wait a second.
I can imagine how you could do that above grade.
But most of this foundation is below grade, isn't it?
Charlie: It is.
So this blue line here represents our grade.
So this is exposed above.
And we're going to waterproof all the way down.
Kevin: And how are you going to waterproof the outside below grade?
Charlie: Wait till you see this.
Remember Hugo, he does all our waterproofing.
Hugo: Kevin, how are you doing?
Kevin: I'm doing alright.
Hugo: How you been?
Kevin: Good to see you again.
Hugo: Good seeing you.
Charlie: So I think this section where we cut open for the garage is going to show a perfect cross section of the foundation to show what Hugo's going to do.
Kevin: Because some of it is below grade, some of it is above grade.
And Charlie tells me, you got some magic trick to waterproof below grade on the outside, but you're going to do it from in?
Hugo: Yeah, pretty interesting stuff.
Kevin: How do you do that?
Hugo: So we actually have these ports that were actually installed into the wall from the inside.
And this port has a grommet here, Kevin.
And as you begin to torque this down, this will expand and lock it into place.
Kevin: So that's the port that you've got in the wall, right there.
Hugo: Correct.
and you will use the wall thickness to determine how far to go in with the drill bit, so that you can put the port to introduce all the material into the wall.
Kevin: And you're hoping to blow foam into this wall and hope it gets to the backside?
Hugo: Water first.
Kevin: Water first.
Hugo: Correct.
Kevin: So you're saying that you're going to pump water into the wall?
Hugo: Correct.
Kevin: Basically saturate it.
and wherever the water goes is where you kind of have a leak.
Hugo: It'll be chased.
Kevin: And then the foam goes to all the wet parts.
Hugo: Absolutely.
Kevin: So you see -- Oh my, God.
Hugo: Pretty interesting stuff.
Kevin: That's crazy.
Charlie: Told you.
Kevin: It works, I'm gonna buy you lunch.
Hugo: There you go.
Kevin: Where are you doing this?
Hugo: Right here on this wall, actually.
[ Drill whirring ] Kevin: Alright, so Raul drilled us a hole.
Hugo: So he's got the hole drill.
Now, the next step would be to put in that port that we talked about.
And he'll torque it down to expand that grommet.
[ Screwdriver whirring ] So as you can see the grommet there and the expansion that was caused, once he torqued that down, the washer moved forward making that grommet expand.
Give this thing a tug and see how well it's into the wall.
Kevin: Oh, that's not going anywhere.
Hugo: No it's not.
It's locked in place pretty good.
So there's that grease fitting.
So now that we're locked into place, the port center, it's torqued.
He's got a valve here.
So he can control how much material he introduces into the wall.
Kevin: So once this starts pumping, can we see it?
Hugo: Absolutely, there's actually a setup outside.
You'll be able to see right through it and give you a good idea of what we're looking at here.
Kevin: Wait, we're doing this above grade, Hugo?
Hugo: Yeah, so this is just pretty much a demonstration, Kevin.
So we can see what would happen below grade with the Earth being up against it.
So you can see the saturation of the water as it spreads out to the foundation.
Kevin: Nice.
Raul's ready to go.
Hugo: Raul is ready to go.
Raul, can you get it going, please?
Kevin: This is going to be good.
Hugo: So this is the perfect case scenario here, Kevin.
As you see, the water saturation through the wall and it's creeping into the mortar joints, it's finding the path of least resistance.
Kevin: Well, let's get the foam going.
Hugo: Sounds good.
Kevin: Oh, yeah, really starting to expand right there.
So once this is all done and we're below grade, give me a sense of how long this application lasts.
Hugo: As long as it's below grade and it's undisturbed, it will last forever.
Kevin: Awesome.
Well, Hugo, I really appreciate you showing it to us.
And I guess now we'll let you do it where you're supposed to, which is below grade.
Hugo: Yeah, absolutely.
Sounds great.
Good seeing you.
Kevin: Good to have you back.
Charlie: Thanks.
Appreciate it.
Hugo: Charlie, Good seeing you.
Kevin: Guess I owe you lunch, Charlie.
Charlie: It was never in doubt.
Kevin: [ Laughs ] ♪♪ Jenn: When it's fall in New England, it's apple season.
And here in Massachusetts, there's over 80 orchards.
You can go pick your own.
I'm here at one today, just down the road from our project house in Westford.
And I've invited a fellow apple lover to tour the farm with me.
Kevin: Hey, Jenn.
Jenn: Hey, Kevin.
Kevin: You invite me to the best remotes?
This is awesome.
Jenn: This is awesome.
This is one of two apple orchards in town, and this one's been here since the mid 1800s.
Kevin: Wow, very cool.
Jenn: And it's been within the same family for the past 40 years.
Kevin: Very nice, and I knew the town that we're working in was sort of known for its apples.
Jenn: Yep.
Kevin: And you delivered, huh?
This is terrific.
Jenn: It's so gorgeous here.
So we have about 30 acres to check out, eight varieties of apples, up for it?
Kevin: I'm ready to go.
Jenn: Let's do it.
[ Apple crunches ] Kevin: Ooh!
Alright, that's good.
How many of these can I eat there?
[ Engine starts ] Here.
Jenn: Oh, sweet.
Thank you.
You know what they call me in high school, right?
Jenn: Unh-unh.
Kevin: Red delicious.
[ Both laugh ] Jenn: [ Laughing ] Oh, my God.
Kevin: Drive on!
♪♪ Kevin: So, what is it with apples and New England?
It seems like it's our thing.
Is that true or...?
Jenn: Apples grow all over the country.
But in particular, here in New England, we have a colder climate.
So the apples here, they all require over 1,000 hours in the wintertime, between 32 and 45 degrees.
Kevin: Oh, they like it cold.
Jenn: They like it cold.
And that helps produce the flavors, the colors.
Kevin: So we get certain varieties, the ones that we love.
It's because they grow really well here.
Jenn: In this specific region.
Kevin: Alright, I got a couple bags, Jenn.
Jenn: Great.
Kevin: Hang on to these.
Jenn: What do you think about these?
Kevin: What am I looking at?
Jenn: I think these are Macouns.
Kevin: Oh, okay.
Jenn: Do you know how to properly pick?
Kevin: Apparently not.
[ Laughs ] You don't just pick.
Jenn: Well, you don't want to damage.
So all -- all apples are handpicked.
They can't be picked by machines, otherwise they'll get bruised.
So what you want to do is you want to support the branch, you want to lift it, and then you twist it off.
Kevin: Oh!
Jenn: If you yank it, you could damage -- damage the wood.
Kevin: So life the branch.
Jenn: Lift it.
Kevin: Twist.
Hey, there you go.
How's that?
Well, that's a good looking apple, Jenn.
What is this one?
Jenn: Macoun.
Kevin: Macoun.
[ Apple crunches ] Mmm!
Oh, yeah.
That's pretty good, too.
Jenn: I know, look at that crisp, white flesh.
Is it sweet?
Kevin: It's totally different than the McIntosh.
Jenn: Yep.
Kevin: Oh, I like that a lot.
Jenn: These trees are 20 years old, and with the right care and weather conditions, they could live another 30 years or more.
These are Empire apples.
It's a cross between Red Delicious and McIntosh.
Kevin: Lift.
Jenn: Lift.
Kevin: And twist.
Jenn: Beautiful.
Kevin: What do we use the Empires for?
Jenn: Baking.
Kevin: Oh.
Jenn: And applesauce.
So it's just a really a great dessert apple.
Oh, I want one.
Kevin: Mmm!
Oh, that's sweet.
You know that expression?
Jenn: What's that.
An apple a day keeps the doctor away.
Jenn: Yeah.
Kevin: I think I'm getting good for the month.
Jenn: Did you also know this is nature's toothbrush?
[ Apple crunches ] Kevin: It's shiny.
Oh, we got a small tree.
Jenn: Kevin, It's small, but a powerful flavor.
Kevin: Yeah.
Jenn: This one is called an Evercrisp.
And it's a cross between Honeycrisp and Fuji.
Kevin: Wow, I've never even heard of Evercrisp.
Jenn: Oh, just you wait.
Taste that.
Kevin: Look at this beautiful one right here.
Jenn: It's a clean taste.
They last so long, you can keep them in your fridge for up to 2 months.
[ Apple crunches ] They're not going to get mealy.
My kids love them.
Kevin: They got the crisp right.
Jenn: Mm-hmm.
Kevin: That's really good.
Mmm, you know what I'm thinking, Jenn?
Jenn: What?
Kevin: I think I'm starting [ Laughing ] to have my fill.
Maybe... Maybe I should bring some back to the job site and pass them out.
Jenn: Yeah, you can share.
You can share with everybody.
You know what?
I've been inspired.
So I'm going to grab a few trees and give them to the homeowners.
What do you think?
Kevin: Ooh!
Good for you.
Alright.
Thanks for the tour, Jenn.
Jenn: Alright, yeah, no worries.
Kevin: Beautiful day to do this.
Jenn: Thanks for coming.
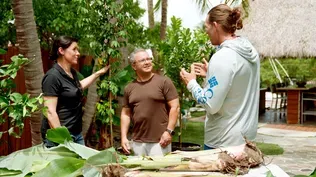
♪♪ Jenn: Okay, so I just got back from one of the local apple orchards Went apple picking.
Emily: Awesome.
Jenn: And was totally inspired.
So I brought you a few trees.
Emily: Yeah, that's awesome.
Ethan: Alright, that's cool.
Jenn: And also, I had Charlie start pre-digging the holes because there were old tree roots here.
I just wanted a few things out of the way.
So I got two varieties.
This one's a Gala apple and that is a McIntosh.
Ethan: I like Gala.
Emily: Okay.
So two varieties for cross-pollination purposes.
When you cross-pollinate plants it encourages a -- a better crop for that year.
Also what we need to check is soil.
And I brought a little rapid test meter.
And all you do is stick the probe into the ground and it'll read the pH.
This wants more of a neutral soil.
So we're looking for between 6 and 7.
Emily: Okay.
Ethan: Okay.
Emily: That seems pretty simple.
Jenn: Would you like to do the honors in the hole?
Emily: Sure.
Let's try it out.
Jenn: Alright.
Place it into the soil.
Emily: Alright.
Does it matter where?
Jenn: No, just... Emily: It says it's a 6 1/2, 7.
Ethan: Perfect.
Jenn: This is apple growing country.
Emily: Perfect!
Jenn: I knew it.
I knew it.
In terms of depth of the plant.
Ethan: Yeah.
Jenn: You want to know a trick?
Ethan: I do.
Jenn: To measure.
Okay.
So what you do, you turn this shovel upside down.
Ethan: Okay.
Jenn: So you don't want to go deeper than this, right?
This is the top of the plant.
You don't want to bury the root flare.
You want to keep this exposed.
So we're going to plant it, like, maybe an inch higher than this.
And that leaves room for mulch, right?
Ethan: Gotcha.
Jenn: So what I like to do.
You don't need a measuring tape.
You just use the bottom of the shovel.
Ethan: Oh.
Jenn: Put it to there close.
Put your hand like that.
You see where the soil meets up, and then you go over to the hole.
Look at the bottom side of your hand.
And if it's higher or lower, that tells us if we need to add or subtract dirt.
Ethan: Just grab it, like, right around here?
Jenn: Yep.
And that's your measuring point.
Bring it over to the hole.
Ethan: Okay.
Right about here.
Jenn: Yep.
So this looks to me like you're going to be too low.
Ethan: Gotcha.
Jenn: We just need -- So that means we need to put a little more soil at the bottom of this hole so it sits a little bit high, like an inch high.
Mm-hmm.
See how root bound that is.
Emily: Yeah.
Jenn: That means when the roots grow in circles around it.
Emily: Okay.
Jenn: If we don't loosen that up, it'll just keep on growing round and round and round.
So I'm going to get it in the hole.
So I have a claw.
Emily: Okay.
Jenn: Would you like to do the honors?
Emily: Yeah.
Let's try it.
Kind of do something like that?
Jenn: Yeah.
So if you didn't do this, the roots would continue growing around in a circle and just and choke themselves.
It'll end up choking the tree.
This way, the roots have opportunity to get out into the soil.
So you're -- you're freeing them from growing in a pot.
Ethan: Right.
Jenn: Alright.
So I am going to incorporate a little bit of compost in with this top soil.
That's going to help the plant get a good start.
Ethan: Now, do I want to be packing it down?
Jenn: Yes, just use your fingers, go around.
And just we don't want air pockets because you don't want it to, like, tilt later.
Ethan: Okay.
Jenn: Alright, Ethan, you want to grab your McIntosh.
Ethan: Right here?
[ Fists thumping ] Jenn: Oh, nice.
Ethan: Easy.
♪♪ Jenn: Alright, that looks pretty good.
Ethan: Cool.
Jenn: And you just mix it together by hand or shovel.
Alright, you guys, I think this looks pretty good.
All I need you to do is keep it watered.
I'm going to come back with some mulch.
Clean up the bed, stake it, and should be good to go.
Emily: So when should we start expecting some apples?
Jenn: I'd say about 2 to 3 years, you're going to have a decent sized crop.
Emily: Okay.
Ethan: Perfect.
Thank you, Jenn.
Jenn: You're welcome.
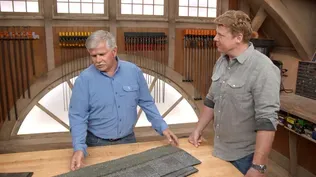
♪♪ Kevin: What is this?
Tom: You like that?
This is our roof patch, so perfect timing.
We're about to raise it up to the widow's walk and install it.
Kevin: I'm so glad it's not one of these soaker tubs.
That's what I thought it was from afar.
Charlie: Yeah, not this time.
Tom: Not a soaker tub.
Kevin: So, are we framing up the opening?
Or is that good to go?
Charlie: Everything's all set.
Maybe a screw gun and some screws.
Kevin: Nice.
Alright.
Tom: So what am I gonna do?
Charlie's going to drive the machine.
I'm going to direct him from down here as far as I can see.
Then you're going to go up in the roof and take over from there.
Then we'll come up and help install it.
Tom: Alright.
It's coming up your way.
Keep your eye on it when you're ready.
[ Telescopic forklift whirring ] Alright.
So we're going to position this right over here in the corner.
And hopefully we can get it to go right by the side of the dormer up and past it.
Kevin: [ Over 2-way radio ] Keep coming forward.
Keep coming forward.
Tom: Alright, Charlie, you want to lay the boom down just a little bit.
That's good.
Alright, drop the tip down just a hair and then stop.
Perfect.
Alright, now we're going to unstrap it, so don't move.
♪♪ Kevin: Alright, that straps off, Tommy.
Tom: Alright.
Good, Charlie.
Get it up and out of the way.
Charlie: Okay.
Going up now.
[ Telescopic forklift whirring ] Tom: Alright, let's take a measurement for a place to stick.
Kevin: Charlie, how are you?
Charlie: There.
I'm gonna start unscrewing this.
Tom: Alright.
So, up against the rough opening there, I'm going to measure down for the inside of the opening of the stairway right here.
It's 97 inches here.
The same thing on the other side.
I'm gonna do 97" on this side.
[ Wood creaking ] Okay, now, we already have our center line this way.
One on that end and one on this end.
And this is the stick that we cut and marked the center line on the stick.
Now this is a positioning stick for the inside of the opening.
So I line the center line up with the chalk line and put each side of the stick on the inside measurement.
I'm good here.
You good?
Kevin: Yeah.
[ Screwdriver whirring ] Tom: Alright, so what the idea of the stick and the positioning of the stick is we'll take the hatch, we'll slide it in over the stick.
So it could be this way a little bit when it comes over drops down on each side of the stick.
We push it in tight.
And that will center it on this end and locate it in the opening.
And we just want to make sure that our center down there is on the line.
So the center on this unit will match the center of the line.
Alright.
Now lay it down.
You should be able to grab onto this flange right here.
You guys have it.
I'm going to have to let it go.
Charlie: Okay.
Kevin: Got it.
Tom: Don't pick it up.
Just lay it right down.
Charlie: We've gotta slide.
Tom: I'm going to let it go.
Charlie: Okay, let it go.
We've gotta slide.
[ Metal scraps ] Watch out for those edges.
Tom: Alright, so what we need to do now is we need to find a center point on that flange, Kevin.
Should be around 36 inches.
Find the exact measurement and put a centerline on the outside edge of the flange.
And that's the mark we use to line up with the chalk line.
[ Speed square clatters ] [ Speed square scrapes ] Tom: Alright, so unhook me.
I'm going to go inside.
You guys lay it down.
Make sure you line up that end, Charlie, with the center mark there.
And I'll watch this one.
We'll put the strap in so it lines right up with the inside.
Kevin: And then a couple screws to secure it before we open?
Tom: Yeah, a couple of screws.
You have the screws?
Kevin: Yep.
Tom: Okay.
Drop it over to me.
Nice and easy.
Don't let it go, Kevin.
Kevin: Right.
Tom: I know how you are.
Alright, slide it to me.
[ Metal thumping ] A little bit more.
Right there.
Tom: Alright.
Put a couple of screws in it.
[ Screwdriver whirring ] [ Screwdriver whirs ] Charlie: [ Fist thumps ] All set.
Kevin: Oh, wow.
Tom: Look at that.
Spring loaded.
Kevin: That is a really nice looking hatch.
That's the nicest one I've ever seen, Charlie.
Tom: It's a beauty.
Charlie: And you know what else?
It has an R-value on the sides as well as the top.
Kevin: Ah, fully insulated.
Tom: And the insulation will keep it from condensating, too, in cold weather.
Kevin: And what do we do from keeping it leaking around the edge?
Tom: Well, it's all going to be flashed.
There's going to be a rubber roof with a pitch packet to keep all the water and shed out to the edges.
Kevin: Any chance we can see that next time?
Charlie: I think so.
Kevin: Cool.
Charlie: Plus, air conditioner should be all framed.
Kevin: Very good.
Alright.
All of that and probably some more next time.
Until then, I'm Kevin O'Connor.
Charlie: And I'm Charlie Silva.
Tom: And I'm Tom Silva.
Kevin: For "This Old House" here in Westford.
Tom: Yeah, it looks good.
Charlie: Should be a nice view.
Kevin: Look at the view.
Are you kidding me?
Tom: Have a nice railing up here.
Kevin: That's awesome.
♪♪ Kevin: Next time on "This Old House"... Richard: There are three reasons why the existing septic system here in Westford no longer complies.
But trust me, the new system doesn't stink.
Kevin: Then, the top half of this staircase was damaged in a fire.
We'll rebuild it step-by-step.
Tom: And we're working on the widow's walk.
Charlie: We're going to make it watertight and prep for the railings.
Tom: Alright.
That's pretty good there.
[ Screwdriver whirs ] Kevin: That's next time.


Support for PBS provided by:
Funding for THIS OLD HOUSE is provided by The Home Depot and Renewal By Andersen.