E18 | Tree Diagnosis, Home Checklist | Ask This Old House
Season 23 Episode 18 | 23m 42sVideo has Closed Captions
How to diagnose and treat a diseased pine tree; Nathan performs a new homeowner checklist.
Lee Gilliam enlists the help of an arborist to diagnose a homeowner's fungal diseased pine tree and provide a treatment plan; Kevin O'Connor and Lee later meet up with the arborist at the barn to see how the treatment plan worked and learn about other common fungal diseases; Nathan Gilbert travels to Detroit to show a new homeowner how to perform maintenance inspections around her house.
Problems with Closed Captions? Closed Captioning Feedback
Problems with Closed Captions? Closed Captioning Feedback
Funding for THIS OLD HOUSE is provided by The Home Depot and Renewal By Andersen.
Support provided by:

E18 | Tree Diagnosis, Home Checklist | Ask This Old House
Season 23 Episode 18 | 23m 42sVideo has Closed Captions
Lee Gilliam enlists the help of an arborist to diagnose a homeowner's fungal diseased pine tree and provide a treatment plan; Kevin O'Connor and Lee later meet up with the arborist at the barn to see how the treatment plan worked and learn about other common fungal diseases; Nathan Gilbert travels to Detroit to show a new homeowner how to perform maintenance inspections around her house.
Problems with Closed Captions? Closed Captioning Feedback
How to Watch Ask This Old House
Ask This Old House is available to stream on pbs.org and the free PBS App, available on iPhone, Apple TV, Android TV, Android smartphones, Amazon Fire TV, Amazon Fire Tablet, Roku, Samsung Smart TV, and Vizio.
Keep Exploring


This Old House Insider Newsletter
Get This Old House exclusive stories, tips, and behind-the-scenes information delivered right to your inbox every month.Providing Support for PBS.org
Learn Moreabout PBS online sponsorship♪♪ Kevin: On "Ask This Old House," our experts travel across the country to answer questions about your house.
♪♪ Today, Lee calls on an arborist to help with a sick pine tree.
Brandon: We're definitely dealing with a fungus here, and there are a few management plans that you can do.
Kevin: Then I follow up with other common tree diseases.
And are you overwhelmed with your new home purchase?
Nathan has a checklist for you.
Nathan: I'm gonna check the shingles.
I'm gonna check the gutters.
I'm gonna check the chimneys.
Kevin: Coming up next on "Ask This Old House."
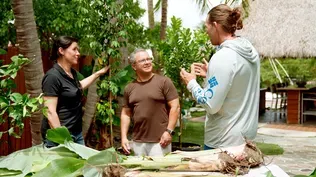
♪♪ Lee: Hey, Chris.
How you doing?
Nice to see you.
Chris: Absolutely.
Thanks for coming by.
Lee: So, I got some emails from you.
Chris: Yeah, I wrote in about this tree right here.
Lee: Okay.
Chris: It's been probably five, six years that I've been trying to solve this problem.
Lee: Okay.
Chris: Every single year, this thing turns orange... Lee: Yeah.
Chris: ...it drops 90% of its needles... Lee: Okay.
...Chris: and then it comes back green a couple months later.
Lee: Okay.
Chris: I've tried everything from more water, less water.
I have exhausted the Internet.
I cannot get this thing to come back.
Lee: Okay.
What I notice -- mulch really high.
Mulch is not good around the tree, up on the base, doesn't allow it to breathe, and things like that.
And then also I also notice fabric paper, alright?
Chris: I love the fabric paper.
Lee: I know.
A lot of people do.
But fabric paper is a no-no.
Just the reason why -- the weeds come in airborne, and then they shoot up that way, okay?
Chris: Okay.
Lee: And the fabric paper does not allow the tree to get water or any, you know, fertilizing or anything like that.
Chris: Okay.
Lee: So I think we should address that.
Chris: Alright.
I've got another tree that's also starting to do this, and that's really what's worrying me.
If we actually look at the tree down here... Lee: Okay.
Chris: ...it's also starting to turn orange, and I just -- I really can't figure out why this is happening to all of them.
Lee: Alright.
I think I'm gonna make a couple phone calls, see if I can get my arborist in to come take a look at it and see what he thinks.
Chris: Yeah, that'd be great.
Lee: Okay?
Chris: Alright.
Thanks, Lee.
Lee: Alright, good.
♪♪ Chris: Lee.
Lee: Good to see you again.
Chris: Absolutely.
Lee: This is Brandon.
Chris: Brandon.
Lee: Brandon Maltby over there at Tree.
Brandon: Chris.
Pleasure to meet you.
Chris: Yeah.
Thanks for coming by.
This is the tree we wrote in about.
I'm hoping you can help us figure out what's going on.
Brandon: Yeah, definitely an issue here.
I mean, you can see just by the discoloration.
All the tips have been dying off.
First thing I want to do is identify exactly what kind of pine tree we have here.
Chris: Okay.
Brandon: I'm gonna do that by looking at the bundles.
Just a neat little trick to help us identify pines.
They're either gonna have two, three, or five.
Chris: Mm-hmm.
Brandon: And there's two needles coming out of this, which tells me it's a red pine.
Chris: Oh, red pine, okay.
Brandon: So, two-needle conifers are very susceptible to needle blight diseases.
Diplodia tip blight's one that comes to mind and even needle cast.
So, I'm gonna get a closer look at the needles.
I'm gonna use a hand lens for that.
It's a 10 times magnification, so it just gets me a little closer 'cause these things can be tough to spot.
So, I'm looking for lesions and just some fruiting bodies here, which really are really just kind of small black dots, which are actually spores of the fungus.
So, it could be a pretty nasty disease.
You can see that the whole tip is browning out.
And it's a fungal disease.
And there are a few management plans that you can do.
One of them would be to remove all the dead needles underneath, any dead twigs, branches, 'cause the spores will overwinter on those and reinfect it.
Chris: Okay.
Brandon: And you have to discard it off-site completely.
You can't bring it in the backyard, throw it in the corner 'cause it can blow back in -- Chris: Gotcha.
So, no dumping it over the fence.
Brandon: Yeah, yeah, yeah, we got to get it out of there.
Chris: Okay.
Lee: No composting or anything like that.
Brandon: Yeah.
Something else we could do is come in and do a disease program.
So, it's a standard fungicide product we use.
And what we're doing is we're protecting the new growth.
So, as the buds break and the needles come out, we're protecting that new tissue.
So, we're gonna come four times and do that during that elongation process.
Chris: Oh, wow.
So, it's actually a multi-step process to solve this.
How does this even happen in the first place?
I mean, the neighbors have the same issue.
Is it something that comes from the nursery?
Is this airborne?
Brandon: Yeah, so, the fungus can kind of be blown in anywhere.
I mean, so -- And what the fungus needs is wet conditions.
So, we had historic rainfall last year.
We had a ton of rain.
Chris: Yeah.
Brandon: So it doesn't surprise me that you have some issues here.
Chris: Okay.
I've been doing a lot of other things to these trees, too, that I'd like to show you to know if -- are these things I should continue to do, as well?
Brandon: Yeah.
What do you got?
Chris: I've used -- Well, the first thing I tried was just your basic fungicide, which I used.
Lee: Okay.
Chris: But I also used at one point -- which I thought worked really well one year, which was tomato fertilizer 'cause it worked really good in the garden.
So I thought, "Hey, maybe something like this can really help the tree grow."
Brandon: Yep.
Chris: but more recently, I've been using these fertilizer spikes, which I've been putting in a couple times a year.
Lee: Okay.
Chris: And they just plant right down by the root, and that seems to have helped, but I'm not really sure if it's something else or that.
Brandon: Yeah, in general, I would say fertilizing's pretty good for trees, but in this case, I can tell that there's a lot of nitrogen in this product.
And a lot of times that's fine, but actually, in this case, it's not.
It's really -- The nitrogen's gonna produce new succulent tissue.
Lee: Correct.
Brandon: And the fungus is gonna attack that immediately.
Chris: Okay, so, even a product that makes it seem like it is helping could actually be hurting in this case?
Lee: Correct.
Brandon: Yeah.
Yep.
Chris: So, I've been doing that for about seven years of hurting this tree.
Okay.
Brandon: Yeah.
Well, I'm gonna give this back to you.
Chris: Yeah, absolutely.
Brandon: And I'm gonna take -- Chris: I will throw that away.
Brandon: I'm gonna take a sample off this tree.
It's just good practice.
I know we're dealing with a fungus, but I want to know exactly what type of fungus.
Chris: Okay.
Brandon: So, I'm gonna send this out to a diagnostic lab.
They're gonna get a look at it and tell us exactly what we're dealing with.
That way, we're not surprised by anything.
Chris: So, once you send that in, about how long does that take?
Brandon: So, once I send this out, it takes about two weeks to get a reply.
Chris: Alright.
We'll have an answer then.
Awesome.
Well, thanks so much for coming by.
Brandon: Hey, thanks for showing me your trees.
Lee: Thanks, man.
Appreciate it.
Brandon: Lee, thanks for everything.
Lee: So, we're gonna get to work.
We're gonna take out all this mulch, get rid of the needles, and then find any of that fabric paper and rip it all out.
See?
We got it already.
This could be the reason why the trees were suffering.
You know?
Chris: Yeah, if you look at it, there's two or three inches of material on top of it, right?
Lee: Yep.
I'm just gonna pull all this out.
Beautiful.
And we'll clean all this up.
We're not gonna get all the needles, but we want to get... Chris: As much as we can.
Lee: ...as much as we can, Chris.
Chris: So, Lee, this is a special tool that I don't have.
Lee: I call this one a cultivator.
It gets you oxygen in the mulch that, like, we're digging around and it helps the mulch to decay.
I'm Santa Claus sometimes.
I might give you that for a gift.
Chris: [ Laughs ] Lee: Alright?
How's that?
Chris: I knew Santa was real.
Lee: [ Laughs ] Okay, so, now we've had our conversation with Brandon about watering.
Chris: Yeah.
Lee: I think this is the way to go -- drip irrigation, okay?
Chris: Okay.
Lee: See that?
Look at that.
It's pipe.
Chris: So, these are -- And I see they're pre-drilled.
So, the water will just run through here.
I don't need to do anything else... Lee: Nope.
Chris: ...to keep these open.
Okay.
Lee: Okay, and if we need to make the pipe longer, we have some extensions.
You know, this will make it longer.
If you want to do a T off it, something like that, okay?
Or an elbow, a 90 on it like that.
And the way we do it is just give it a little heat.
See that?
Chris: That totally just expanded when you did that.
Lee: Correct.
And see that?
And then slide this in all the way.
It holds on to it.
Chris: And so there's no coupling or anything?
As soon as that cools, that just forms the bond that we need?
Lee: That's it.
Chris: Wow.
Alright.
Lee: And then when we want to staple it to the mulch or the dirt, we use these staples.
And these work really nice.
Chris: Is there a recommended distance that we need to have away from the stumps of the trees and all that?
Lee: Good question.
I like to go at least 12 inches off the tree, 10 to 12 inches off the tree, 'cause that's where the root system is.
Hopefully, you know, you want to go as far as you can, you know, off the tree.
Chris: Okay.
Are the staples gonna keep this thing down?
Lee: Staple will keep it down.
Chris: Okay.
Lee: Yeah, they secure it really well.
Chris: Okay.
Especially with kids.
It doesn't become, like, a tripping hazard or anything like that.
Lee: No, it won't.
Chris: Awesome.
So, when we put this down, does it need to be underneath the mulch, above the mulch, does it matter?
Lee: Good question again.
Full of questions today, aren't you?
Chris: Sorry.
Lee: It all depends on your preference.
Chris: I love to hear myself talk.
Lee: It's all about your preference.
If you like it on top or underneath, it all depends on what you want.
Me personally, at my home, I like that on top so I can see it working.
Chris: Okay.
Lee: Okay, so, let's install the mulch.
Chris: Okay.
Lee: And then we'll put the drip down after that.
Chris: Alright.
That sounds good.
Let's go do it.
Lee: Okay.
Let's go.
This is the leaf mulch I love.
There you go.
It's really good, organic, breaks down.
So, what I want to do now is we're gonna toss this down, like maybe half-inch to a quarter of an inch.
Chris: I mean, this is something I could get used to.
Lee: Yep.
Chris: [ Laughs ] It's not too bad to actually just throw it under.
I've always thought like, hey, you got to use a shovel.
Lee: No.
Just toss it.
Chris: You know, just toss it.
Lee: Yep, just toss it in.
So, now we're gonna roll the drip.
We'll put a staple in the ground.
Perfect.
How's it going in?
You need the hammer?
Chris: No, it goes in pretty quick.
Lee: Okay.
Get that down in there.
♪♪ What do you think?
Chris: I think it looks really good, Lee.
Lee: Alright.
So, Brandon came by, told us about the needles.
Chris: Yeah.
Lee: Alright.
Got to keep them clean, okay?
Watering's changing differently now.
So, we got it drip instead of the spray.
The fabric paper is gone.
And we did some nice mulch.
Chris: Yeah, which looks fantastic.
I love the contrast, love the color.
Lee: It looks good.
But if we can keep the needles out, that'd be great, and go from there.
Chris: Yeah.
I'll keep pulling them out.
Thank you so much your help.
Lee: Nice to meet you.
Talk to you soon.
Take care.
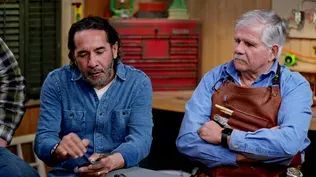
♪♪ Kevin: So, Chris seems happy, huh?
You guys cleaned it up nice.
Lee: Not bad.
Came out good.
We have some issues with, you know, the disease.
I brought in Brandon in.
He can talk to you about that.
So, did the lab get back to you and tell you what you had?
Brandon: Yeah, we got the results, and it came back with not one, but two fungal diseases.
Kevin: Oh.
Lucky him.
Brandon: Yeah.
Kevin: And they were what?
Brandon: Needle blight and needle cast.
Kevin: Alright.
And so what do you do for those?
Brandon: So, we put it on a complete disease program.
Because of the severity, we went in the springtime, and as the new needles emerged, we went in and timely made fungicide applications.
Lee: Mm-hmm.
Kevin: Alright.
And so you went back, took a picture -- Oh, there it is right there, huh?
Well, that looks pretty good.
Full on the bottom.
That's -- Is that what you were hoping for?
Brandon: Yeah, so, that's the new growth.
That's all it has right now, and the goal is to keep that new growth rate to next year until it pushes out more growth.
Kevin: And what's your protocol for doing that?
You gonna come back and spray again?
Brandon: Yeah, so, I'm gonna recommend putting this on a program for another two, three years.
Kevin: And then hopefully, after two or three years, it's healthy enough, strong enough, it can fend off or the blight's gone somewhere else?
Brandon: That's correct, yep.
Lee: And how often are we spraying this a year?
Brandon: So, again, in the springtime, we're about every two weeks.
Lee: Okay.
Brandon: And then once in the fall.
Kevin: Hmm.
Okay.
So, what else is out there?
You must see it all.
What are we worried about?
Brandon: We see a lot of diseases.
So, the most common disease I see is actually this disease called apple scab.
Lee: Mm-hmm.
Brandon: So, as the name suggests, it -- Kevin: That's this one?
Brandon: Yeah.
It infects apples and crab apples.
Kevin: Yep.
What do you do about that?
Brandon: So, this here, it's a fungal disease.
It infects the leaves, the fruit, and even the flower, so to the point where fruit can be unfit to eat.
Big problem for commercial growers.
Little lesions pop up.
You can see yellow to brown spots.
And it'll cause premature leaf drop.
Kevin: And the cure?
Brandon: The cure would be -- The best management is to plant a disease-resistant tree.
Kevin: Which exists, obviously.
Brandon: Which exists.
They're always breeding new trees.
Kevin: Right.
And if you want to work with something you've got, anything?
Do we -- Brandon: Pruning.
Pruning is great.
The strategy there is to thin out the canopy.
You want to allow more light, more airflow.
You want to reduce the leaf wetness in the spring.
Kevin: Okay.
That doesn't look too great.
but that's good to know there's something to do.
Whoa!
Lee: Look at that, huh?
Kevin: What is that?
Brandon: Yeah, so, this is apple cider rust.
This is a very common and very... Kevin: That's common?
Brandon: ...scary-looking disease.
Kevin: It's terrifying-looking.
What's going on there?
Brandon: So, this is a neat disease in the fact that it's -- it needs two trees to actually complete its life cycle.
So, it needs an apple, needs a cedar tree.
Kevin: They both have to be present.
Brandon: They both have to be present.
It's this neat, symbiotic relationship they have with one another.
Kevin: And I'm looking at a -- That looks like it's on a cedar, right?
Brandon: That's on a cedar.
So, those pop out in the springtime, and it sends spores off over to the apple tree.
Lands on the apple, infects that, and then the apple sends it right back to the cedar.
Kevin: That's awful.
And the cure or the remedy for this?
Brandon: So, remedy is, if you actually remove one of the trees, you remove the disease.
But just like the apple scab, you can -- same management plans for the apple tree, Cedar trees you don't really have an issue with.
Kevin: Right, okay.
Brandon: Except for this.
Kevin: That thing is right out of a sci-fi movie.
And what am I looking at here?
Brandon: So, this is a leaf on a beech, and this is called beech leaf disease.
Kevin: I've heard about this.
This is really bad.
Brandon: Yeah, so this is really threatening the population of beech trees.
Kevin: So, I've got this going on, on my property, and correct me if I'm wrong, but he's like -- There's no cure as of now.
He's just trying to make the trees just limp by.
Brandon: Yeah, so, there is no cure.
It is very new, and... Kevin: What is it?
Brandon: So, it's a nematode.
It's a microscopic worm, of all things, and it goes inside the leaf, it moves its way into the bud, does its damage in the bud, so when it leafs out in the springtime, you get distorted leaves.
Kevin: Yeah, they don't look good.
Brandon: Yeah, to the point where you don't even get any leaves.
Kevin: Right.
Okay.
And so what's the idea?
Just try to keep them as healthy for as long as possible, until you guys maybe come up with a cure?
Brandon: Yeah, exactly.
Kind of monitor, you know, continue to wait and see, and hopefully some research comes in.
Kevin: Alright.
Well, sad news right now, but let's hope you guys come up with something 'cause we got a lot of beech out that we want to save.
Brandon: Yeah.
Kevin: Good deal.
Brandon, thank you very much.
Brandon: Of course.
Kevin: Appreciate it.
Where'd you find this guy, Lee?
He's a real treat.
Dr. Disease here.
Geez.
♪♪ Nathan: We get a lot of questions from first-time homeowners.
They're a little bit overwhelmed with their big new purchase.
They have questions about maintenance, about things they should be checking.
We're in Detroit, and I'm gonna help a homeowner who wrote in about this exact issue.
Hi, Armisha.
Armisha: Hi, Nathan.
Nathan: Nice to meet you.
Armisha: Nice to meet you.
Welcome to Detroit.
Nathan: Thank you very much.
First off, beautiful home... Armisha: Thank you so very much.
Nathan: ...in a beautiful neighborhood.
Armisha: Oh, awesome.
Thank you.
Nathan: You recently bought this house, right?
Armisha: Yes.
I am a first-time home buyer.
Nathan: So, we were talking back and forth, and you were saying, what are some things you can do to kind of become familiar with your home?
So, I was thinking hard about this, and I created a kind of a homeowner checklist that we can go through.
Armisha: Okay, awesome.
Nathan: Since we're outside, I kind of want to start with your roof and work from the top all the way down.
I'm gonna check the roof.
I'm gonna check the shingles.
I'm gonna check the gutters.
I'm gonna check the chimneys.
Alright, so, first glance, your roof shingles look real good.
Armisha: Okay.
Nathan: I see a little bit of granules inside your gutter, which is normal.
If you start to see excessive amounts, you can tell that your roof is starting to kind of deteriorate a little bit.
You probably want to get it checked by a roofer.
Armisha: Okay.
Nathan: Bricks look good.
Flashing looks pretty good on this side.
One thing that I'm picking up, though, on the back side of this gutter, I can see through the -- the flashing isn't coming out over the back side of the gutter.
So, I'll take a couple of pictures, and I'll show them to you.
Might want to call a gutter guy or a siding guy that can come and maybe make a little repair there.
But everything else looks pretty good.
Armisha: Awesome.
Nathan: So, if you didn't have a ladder or you don't want to go up there, another way you can check is looking at the downspouts.
So, we'll come over here.
Armisha: Okay.
Nathan: We'll look at where this leads out to here.
If there was an excessive amount of granules that was forming here, that would be a telltale sign that your shingles are starting to go.
Armisha: Okay.
Awesome.
Nathan: Easy way to check it.
Also to the cleanliness.
There's nothing here.
But if you saw a lot of leaves, sticks, debris, it might be time to clean the gutters.
Armisha: Okay, good to know.
Okay.
Thank you.
Nathan: Alright.
So, it's a good rule of thumb about once a year to walk around the house, check your siding.
So, as I walk around, I'm looking at your bricks.
They look in good shape.
I'm looking at your mortar joints.
So, we have our bed joints that run horizontal.
And then we have our head joints that run vertically.
So, we're checking those, making sure no mortar's falling out.
Stepping back, looking at your vinyl siding.
Alright, so, I can see that one piece there that's falling down.
I think we can definitely tighten that up for you.
Armisha: Okay.
Nathan: Big thing to keep your siding tight, keep the pests out.
So, we want to keep everything tight and keep them out.
Let's grab the ladder and fix that real quick.
Armisha: Awesome.
Oh, wow.
Huh.
Simple as that.
Nathan: Yep, I just need to snap it back in place and secure it with a siding nail.
Alright, that's all set.
Armisha: Oh, wow.
Nathan: Rest of the house looks good, so let's head inside, go up in the attic.
Armisha: Alright, awesome.
Nathan: Alright, so, we'll move this panel out of the way.
Armisha: Alright.
Nathan: Take a look.
Armisha: Hopefully no critters, fingers crossed.
Nathan: Yes.
So... Alright, so, I'm just gonna take a glance around.
Armisha: Okay.
Nathan: We're looking for water damage.
Everything looks really good.
Insulation's not bad.
It's really clean.
I don't see any pests.
You know, we're looking again for signs of pests, raccoons... Armisha: Nice.
Nathan: ...any bats.
Nothing.
Armisha: Okay.
Nathan: So everything looks pretty good up here.
Armisha: Oh, great.
Nathan: Your insulation.
It is insulated.
It's on the thinner side.
You know, you might want to upgrade that to a higher R value, which will be a little bit better in the wintertime and in the summertime.
A lot of states offer rebate programs, so you could call your state, see if they offer it.
They'll come out, size it up, tell you what you need, and give you a price.
And usually it's drastically lower than what you would pay just to bring someone else in.
Armisha: Okay, awesome.
Thank you.
Nathan: Now let's start to look at your windows, too.
Armisha: Alrighty, great.
Nathan: Alright.
Armisha: Okay, so, Nathan, I have a total of 20 windows throughout the house, and you can see right now that this is starting to fog up.
So, can you tell me what exactly is going on here?
Nathan: Yeah.
So, the seal has failed.
The gas escaped, and you have moisture getting in.
The good news is you have a really traditional vinyl replacement window.
Easy to get in, easy to take out.
You can even replace this individual sash if you wanted.
Armisha: Okay.
And what exactly is a sash?
Nathan: So, you have your window sashes.
So, it's kind of the assembly of your glass and your frame.
So, on this one, it's a double hung, so you have an upper sash and a lower sash.
Armisha: Okay.
Nathan: And as I walk up to a window, things I like to look for -- We're looking at the glass.
We know this failed.
This is still good.
I'm gonna raise it up.
Okay, and I check the screen.
Good shape.
I'm gonna tilt this out, and I check the glass from the outside, which is great.
These are tilt wash, so you can wash the outsides of your windows from up inside the house.
Armisha: Nice.
Nathan: Those look good.
What those do is those help take the weight of the window as you raise and lower.
Armisha: Okay.
Nathan: You have your sash stops on your left and your right.
You can spring those out, and those will prevent it -- You know, if you want to let a little natural, you know, air ventilate, you can put those in.
Keep someone from coming in the house.
Then you have your sash locks.
So, they're not quite joining right now.
But one thing I always recommend, when you're not using the window, is try and keep the sash locks engaged.
It helps force the lower one down, the upper one up, and create a tight seal across the middle of the window.
Armisha: Oh, okay.
Great.
Nathan: Yeah.
Alright, so, the next few things I want to talk about is your electrical, your plumbing, your heating.
But let's get started with the electrical, if you want to show me where your panel is?
Armisha: Sure.
Nathan: It looks like you have a nice new upgraded electrical service here.
First thing, really well labeled.
We come over here, we have our main breaker, main circuit breaker, and we can shut that off if we want to take the power away from the home, if there was an emergency or something like that.
Going down, we have our individual circuit breakers all set up for different amperages.
Say you're doing some work on the kitchen and you need to shut the power off there.
You would come, identify where it is, go over to that circuit breaker, and shut it off.
And then when you're done with the work, you can turn it back on.
Most likely your electrician will come down and handle that.
Down here we have some surge protection, which is great to have.
So you are good to go there.
So, you have a good, safe panel.
Next let's look at your main water line coming in.
Armisha: Okay.
Nathan: You have some new parts and pieces here.
I can see you have a new gate valve.
You have your new water meter, and then you have your ball valve over here.
Armisha: Mm-hmm.
Nathan: This is where you're gonna come to shut off your water in case of an emergency.
Really easy to know -- if it's in line, you have flow.
As you turn this down, you're cutting off that flow.
One thing I'd like you to do is get, make, or buy a really nice big sign that says "Shut off" so if someone comes to your house and there's an emergency, they know where to go to shut it off.
Armisha: Okay, and what type of emergency would I be experiencing?
Nathan: It would be a big emergency.
So, like, if your water heater goes, you have water pouring out, basement's starting to fill up, you want to come down here and shut it off.
Armisha: Awesome.
Okay.
Good to know.
Nathan: So, looking up, I see we have a gas line coming in.
And the first rule with gas is, if you smell it in the house, it's time to get out.
Armisha: Okay.
Nathan: Get outside.
Call the people you need to call.
It might be the gas company, the fire department.
And then they're gonna come, and I'll show you outside what they'll probably do when they show up.
Armisha: Okay.
Nathan: Alright, so, if you smell gas inside the house, first thing's get outside.
Call 9-1-1.
Call the gas company.
They'll come out.
What they're gonna do is they're gonna come over here to your gas meter, and they're gonna turn off the supply going into the house.
They'll turn that, and they might even lock it off until everything's cleared.
Armisha: Okay.
Awesome.
Alrighty.
Great.
Nathan: So, we covered all the major things, and now is the best part.
We get to talk about tools.
And this is a set of tools that I picked up that I think you could use to accomplish any small task around the house.
So, to go over them quickly, we have a set of screwdrivers, both straight slot and Phillips.
We have a utility knife, nail set, pry bar, both big and small, quality flashlight.
We have some silicone lubricant.
So, that's good for sliding doors, keeping everything lubed up.
We have a nice hammer.
We have water pump pliers.
Level.
16-foot tape measure.
Allen key set.
Caulking gun.
We have a quarter-inch ratchet set with adjustable wrench and a screwdriver.
We have an electrical tester.
Stud finder.
We have a drill, cordless drill, and a cordless impact gun, and with that a nice assortment of drill bits and different bits inside.
Armisha: Nice.
Nathan: Alright, lastly and most importantly, I'm gonna leave you with this new binder here that I want you to fill up with the most important information you have about your house -- so, probably a drawing of the layout of your floor plan, all your important contacts, your electrician, your plumber.
Your manuals -- they're all gonna go in here.
Maintenance logs.
So, when are we swapping out smoke detectors, CO detectors, filters on some of your mechanical stuff?
You know, all that information can be left in here, and when you need it, you know right where to go.
It's right there at your fingertips.
Armisha: Alrighty.
Nathan: Alright, well, congratulations on your home.
Let us know how you make out, and I'm gonna leave this with you.
Armisha: Thank you so very much.
Nice meeting you, Nathan.
Nathan: You're welcome.
Good to meet you, too.
♪♪ Kevin: Next time on "Ask This Old House"... Did you know that mini splits require maintenance?
Richard shows us how to keep them up and running.
Then Mark and Jenn answer the call to help a homeowner who wants to add curb appeal to their corner lot.
Jenn L.: We're either looking to kind of level this off or build a retaining wall around it, just to kind of keep everything contained in here and make it look a little bit nicer and function better, as well.
Kevin: All that on "Ask This Old House."


Support for PBS provided by:
Funding for THIS OLD HOUSE is provided by The Home Depot and Renewal By Andersen.